


Impinger I -–1000 Series Service Manual - Domestic
41
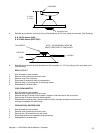
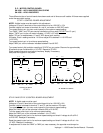
FLAME SENSOR
1. Shut off power at main breaker.
2. Remove control panel top and front cover.
3. Remove burner assembly (see burner assembly).
4. Disconnect one (1) wire from flame sensor.
5. Remove flame sensor by removing one (1) mounting nut.
6. Reassemble in reverse order.
NOTE: Be sure flame sensor is not bent or touching any other burner parts.
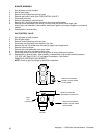
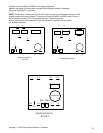
BURNER IGNITOR
1. Shut off power at main breaker.
2. Remove control panel top and front cover.
3. Remove burner assembly.
4. Remove flame sensor.
5. Remove pilot shield and pilot shield extension.
6. Remove burner igniter.
7. Reassemble in reverse order.
NOTE: Be sure to reconnect burner igniter cable to ignition control.
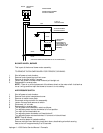
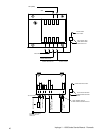
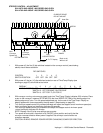
TRANSFORMER 120/24 VAC
1. Remove control panel top and front cover.
2. Remove control box cover from burner blower motor.
NOTE: The complete burner blower motor assembly, with control box (PN 369359), is no longer
available. The blower motor assembly (PN 369265) has been changed to a
burner motor kit (PN 369366). If the burner blower motor or 24V transformer
(PN 369531 ) are replaced, the following modifications must be made:
3. Shut off power at main breaker.
4. Remove control box and components from burner blower motor.
5. Mount transformer on air switch bracket (use transformer as template).
6. Discard control box and relay. Material needed: #29 drill bit and #8 x 3/8" self tapping screws (3 each)
7. See Burner blower motor section for wiring information.
8. Replace covers and check system operation.
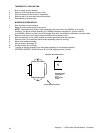
BURNER LIGHT (24 VAC) - GAS OVENS
1. Shut off power at main breaker.
2. Remove control panel top and front panel.
3. Remove access cover.
4. Remove two wires from burner light, note number and location.
5. Grasp body of light assembly and slide sideways to remove.
6. Reassemble in reverse order and check.
HEAT LIGHT (125 VAC) - ELECTRIC OVENS
1. Shut off power at main breaker.
2. Remove control panel top and front panel.
3. Remove two (2) wires from heat light, note number and location.
4. Grasp body of light assembly and slide sideways to remove.
5. Reassemble in reverse order and check.
THERMOSTAT, Hl-LIMIT - ELECTRIC OVENS
1. Shut off power at main breaker.
2. Remove control panel top and front cover.
3. Remove the two-(2) wires from the thermostat located on the back wall of the control box.
4. Remove two (2)-mounting screws.
5. Reassemble in reverse order.
NOTE: Be sure to press red "reset" button on new thermostat to ensure that it is in the
"closed" position.