10
To perform the test bake:
1. Select identical pans for the test. Choose the pans
based on the width of the conveyor; you should space
the pans in line completely across the conveyor with-
out having them touch each other. For instance, for a
32 /813mm-wide conveyor, you could use three 10/
254mm pans or two 15/381mm pans.
You will need enough pans to have three complete rows.
This eliminates the possibility of a single row distorting
the results. If necessary, the test can be run with only
1 row of pans, but the results are not as reliable.
2. For a pancake batter test, mix the pancake batter as
instructed by the manufacturer. Pour the batter
EVENLY into the test pans to a depth of 1/4 (6mm).
You may use any type of pancake mix that is available,
AS LONG AS YOU USE THE SAME TYPE THROUGH-
OUT THE TEST.
For a dough test, have the customer make up a thin
crust dough in each pan. The dough should be of a
consistent thickness in each pan and should be no
thicker than 1/4 (6mm). Thicker doughs will provide
too great a cushion and will distort the test results.
3. Place the pans side-by-side on the conveyor. The front
and rear edges of the pans should be aligned so that it
is easier to see if there is a front-to-back bake prob-
lem. DO NOT stagger the rows of pans diagonally.
Also, check that the pans do not touch each other;
this can transfer heat to the test product and distort
the results.
4. Run the products through the conveyor at the
customers normal bake time and temperature settings.
5. Read the results of the test. Each pan of product
should have the same coloration.
If you used pancake batter, the sugar in the mix will
brown very rapidly if over-baked. This highlights an out-
of-balance oven.
If the product lightens or darkens slightly from front-to-
back in only one row, there is probably not a significant
front-to-back bake problem. If the product is notice-
ably lighter or darker at the front or back in ALL of the
rows of pans, there is a front-to-back bake problem.
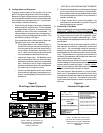
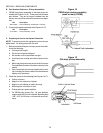
See Figure 7.
Also, remember that
consistently uneven baking on
the top of the product may indicate a problem with the
upper air fingers. Likewise, consistently uneven bak-
ing on the bottom of the product may indicate a prob-
lem with the lower air fingers.
If the oven has the current standard air finger type,
you should contact Middleby Technical Services
for assistance.
If the oven has the PS300/350-style air fingers with
a shutter plate, it is possible to adjust the posi-
tions of the air shutters to correct a front-to-back
bake problem. Proceed to Step D, PS300/350 Air
SECTION 2 - AIR FLOW AND HEAT TRANSFER
Finger Shutter Adjustment.
D. PS300/350 Air Finger Shutter Adjustment
Before attempting to properly balance a Middleby
Marshall oven equipped with shutter fingers, you should
understand the principles of operation of this type of
finger.
The oven moves approximately 2000 ft.³ of air per minute.
When this large amount of air is moved through the
plenum and fingers it rushes through the plenum and to
the end of the air finger. This creates a back pressure
of air inside the finger and tends to deliver more air onto
the product at the front of the air finger.
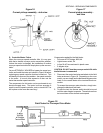
The inner plate has a separate shutter plate riveted to it
at a slight angle. Since there is more pressure at the
end of the fingers (front of the oven) than at the plenum
(rear of the oven), the shutter plate is angled to restrict
the air flow near the front of the oven. This creates a
proper balance permitting an even amount of air to exit
out of the holes across the width of the conveyor. See
Figure 8.
Before adjusting the shutters, it is necessary to deter-
mine if the finger is providing a balanced air delivery
across the width of the conveyor. This is the purpose
Figure 7
Front-to-back uneven bake
NOTE: In this example,
the front of the product
is darker than the rear.
The opposite condition
is also possible.


