


23
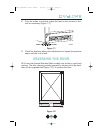
After the first slab of ice is produced, ice production will stop until the
refrigerator side of the CLRCO2075 reaches the set point tempera-
ture. After the refrigerator reaches temperature, ice production will
begin again.
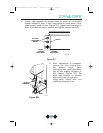
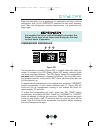
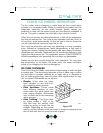
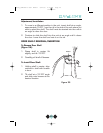
TEMPERATURE CONTROLLER
Figure 28
The temperature controller (Figure 28) is located below the clear ice
maker. It consists of an LED display, three LED status indicator lights
and three touchpad buttons. The LED display shows the temperature
set point and is calibrated in degrees Fahrenheit. The controller is fac-
tory programmed for a set point of 38°F which will show when the unit
is first powered up.
To display actual temperature in the refrigerator, press the “WARMER”
button momentarily. A solid status indicator light (1, Figure 28) will
show and the air temperature reading in the cabinet will show for
approximately 10 seconds.
To adjust the temperature set point, press the “SET TEMP” button
momentarily; the display will flash. Press the “WARMER” or “COOLER”
button as desired to change the set point. When the desired set point
shows on the display, wait 10 seconds and the new set point will be
saved. Wait 24 hours for the temperature to stabilize before checking
the actual temperature again.
SET
TEMP
WARMER
COOLER
CLRCO011
1 2 3
It is possible that dirt or scale will dislodge in the water line.
Always throw away all ice cubes made during the first two
to three hours of operation.
30005_CLRCO2075 User Manual 8/22/03 4:24 PM Page 23