


Chapter 2
Installing Valves in the Heated Oven Valve Installation
Operating Manual 21
Installing Valves in the Heated Oven
Installing valves consists of the following steps:
Step 1. Installing the solenoid
Step 2. Disassembling the valve and actuator
Step 3. Installing the valve and standoff
Step 4. Connecting gas lines from the solenoid to the actuator
Step 5. Installing the actuator to the valve standoff
Step 6. Testing the valve
CAUTION Turn the actuator gas off before you start these procedures.
Step 1. Installing the Solenoid Valves
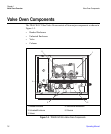
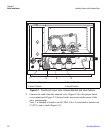
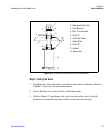
1. Locate the solenoid manifold in the rear floor of the valve compartment
(Figure 2-1). The space closest to the rear of the GC is reserved for
pneumatic valve 1, next is valve two, and so on.
A total of 6 pneumatic valves can be installed (up to 4 in the upper
compartment and up to 2 in the lower).
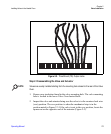
2. Remove the rectangular shaped cap from the manifold using the #0 phillips
screwdriver.
3. Secure the solenoid valve to the underplate using the two screws supplied
with the valve.
CAUTION Tighten screws evenly, taking care that the solenoid gasket rests on all surfaces to
prevent leaks