


Chapter 2
Valve Installation Installing Valves in the Heated Oven
26 Operating Manual
5. Verify there are no major leaks in the fittings.
NOTE Applying pressure to this side of the actuator will ensure that the actuator stays in the ccw
position.
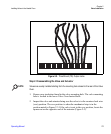
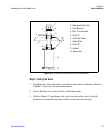
6. Take the other 1/8” piece of nylon tubing and place it in the upper fitting on
the actuator. Be sure the tube passes through the ferrule in the fitting. Tighten
the fitting using the 3/8” open end backup wrench.
7. Connect the opposite end to the solenoid fitting.
NOTE The tubing can be released from the solenoid by pushing down on the solenoid fitting and
pulling out on the tubing at the same time.
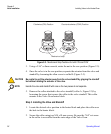
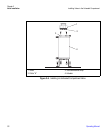
Step 5. Installing the Actuator to the Valve Standoff
1. Carefully fit the actuator into the valve standoff being sure not to rotate the
valve.
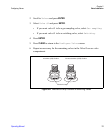
2. Once the two square fittings on the actuator and valve are coupled, tighten the
collar on the valve. Be sure this fitting is very tight so the actuator will not
rotate on the valve standoff.
3. Slide the valve and actuator assembly up or down to the desired location and
tighten the upper collar to hold the valve and actuator in place.