16
B. Drain Rinse Inspection (continue from Startup Procedure)
1. Turn OFF the ON/OFF lever/switch.
2. Turn ON the water supply to the steamer.
3. Turn ON the Main External Power Switch.
4. The 3-minute drain rinse cycle starts.
5. The drain is flushed with fresh water.
6. Stop the drain rinse cycle before it is complete by setting the ON/OFF lever to the ON position.
7. Drain rinse stops.
8. The operating control circuits energize.
9. The green Power ON and amber SureCook (Timer Models only) indicators on the control panel
light.
10. The reservoir begins to fill with water.
11. Restart the drain rinse cycle by setting the ON/OFF lever to the OFF position.
12. During the drain rinse cycle, make the following checks:
a. The ON/OFF lever must be turned fully to the OFF position to start the drain rinse cycle.
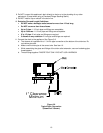
b. Look at the one-inch vent gap between the steamer drainpipe and the floor drain.
A steady stream of water drains from the steamer.
c. Check for plumbing leaks.
d. After about 3 minutes, the cycle is complete.
e. Look at the one-inch vent gap between the steamer drainpipe and the floor drain.
No more water drains from the steamer.
C. Operating Tests and Final Checkout Procedure (Continue from Drain Rinse Inspection)
1. Set the controls:
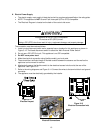
a. Turn ON the Main External Power Switch.
b. Turn OFF the ON/OFF lever. (Timer Models: The green and amber indicators on the control
panel are not lit.)
c. Set the TIMED/MANUAL switch to TIMED. (ON/OFF models the ON/OFF switch is OFF.)
d. Set the timer to zero by turning the dial counterclockwise until it points to the 0 mark.
2. Open the cooking compartment door.
3. Turn ON the ON/OFF lever. The reservoir begins to fill with water.
4. As the reservoir fills with water, check that the green Power ON and amber SureCook indicator
lights turn ON.
5. Close the compartment door to close the door interlock circuit.
6. As the water level in the compartment reservoir rises:
a. No water flows from the drain opening.
b. Check for plumbing leaks in the control compartment.
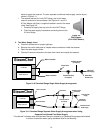
7. When the water in the reservoir reaches the level of the lower probe, the heating elements and
the convection fan turn ON and the steamer heats to the standby temperature.
8. Open the door; the heating elements and convection fan turn OFF.
a. The water level in the reservoir continues to rise.
b. The water in the reservoir stops rising when water reaches the upper probe.
• If the water level continues to rise above the tip of the higher probe, turn OFF the
ON/OFF lever and see the Operators Troubleshooting Guide.
• If the problem persists, shut down the appliance and call a qualified Cleveland Range
authorized service representative.


