


Chapter 14 Removal and replacement of parts
Page 14.4
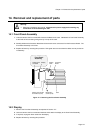
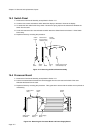
14.8 Back-up battery
1. Ensure that the unit is disconnected from all power supplies.
2. Ensure that a new battery (CR2430) and a thin edged, non-conductive implement are within easy reach.
3. Undo the six captive screws which attach the front panel assembly to the case.
4. Carefully lift the front panel assembly away from the case.
5. Undo the yellow and green Earth lead from the panel. Do not undo the connecting ribbon cables.
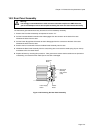
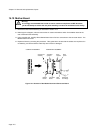
6. Locate the back-up battery on the Processor Board.
7. Referring to the diagram below, use a non-conductive implement to gently lever the battery upwards from
near the rear of the clip. As soon as the battery lifts up a small
amount, gently ease the battery in a horizontal
direction away from the holder and the clip. Keep the battery in contact with the clip.
DO NOT LIFT UP THE CLIP MORE THAN
NECESSARY TO MOVE THE BATTERY.
8. Keep the battery in contact with the clip until you are prepared to insert a new one.
When the clip loses contact with the battery, there is a maximum of 10 seconds before all configuration and
database information is lost.
9. Once prepared, remove existing battery and then slide the new one under the clip and into the holder -
observing the polarity symbols. Complete this action within 10 seconds.
10. Replace all items in the reverse order of removal.
Part of
Processor
Board
Battery
holder
Battery
Clip/
contac
t
Figure 14.5: Where to find the back-up battery on the Processor Board