


Chapter 2 Getting started
Page 2.10
Turn on the
power
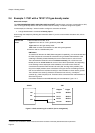
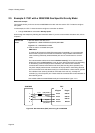
4. Turn on the power to the system. The system goes through a Power On Self Test (POST)
routine which takes less than 30 seconds. When it is finished, ignore any flashing alarm
lights which may appear.
Go to the
wizards menu
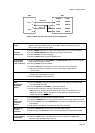
5. Press the MENU button to go to Page 1 of the Main Menu (if you aren’t there already).
6. Press the DOWN-ARROW button twice to go to Page 3 of the menu.
7. Press the b-button to select “Configure”.
8. Press the a-button twice to go to the wizards menu.
Clear existing
configuration
(This is optional)
9. Press the b-button then the UP-ARROW or DOWN-ARROW button to scroll through the
option list until “Initialise” is shown.
10. Press the b-button to select “Initialise”.
11. Press the d-button to confirm that you want to lose the current configuration.
12. Wait a few seconds until “initialise” on line 2 of the display changes back to
“Choose option”.
Select the
wizard
13. Press the b-button then the UP-ARROW or DOWN-ARROW button to scroll through the
option list until “Temperature” is shown.
14. Press the b-button to select “Temperature”.
Start of wizard 15. Press the d-button to answer YES to the question “Edit Line Temperature?”.
Choose the
Analogue Input
16. Press the b-button
17. Press the UP-ARROW button until “Analogue input 3” appears.
18. Press the b-button and then the ENTER button to confirm selection of
“Analogue input 3”.
Select the type
of Analogue
Input
19. Press the ENTER button to keep the default selection of a 4-20mA type input.
Set Analogue
0% and 100%
range
20. Press the b-button.
21. Type in a suitable maximum temperature value and then press the ENTER button.
22. Press the ENTER button to move on to the next prompt.
23. Press the b-button.
24. Type in a suitable minimum temperature value and then press the ENTER button.
25 Press the ENTER button to move on to the next prompt.
Make the
Analogue Input
“live”
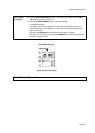
26. Press the d-button.
27. Press the UP-ARROW button so that “Set” changed “Live”.
28. Press the ENTER button once.
Skip over the
next few
questions
29. Press the c-button several times to answer NO to all questions until the wizard is exited.
View how you
have configured
Line temperature
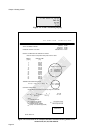
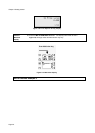
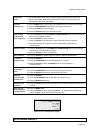
30. Press the MENU button.
31. Press the d-button and then press the a-button. The display looks similar to that shown
in Figure 2.11 although values shown may vary.