


– 40 –
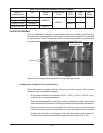
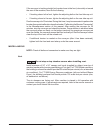
Lower Trim Panels (Front) and Rear Panels
When installing the lower trim panels on the front of the machine, butt each panel
end to end. With the bottom of the panel held out on a 45° angle (Fig. 43), hang the
upper lip of the panel over the hooks located just below the doors (Fig. 44). Swing
the bottom of the panel down and snap the lower panel clips under the frame.
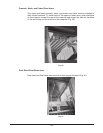
Fig. 43 Fig. 44
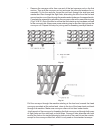
When installing the rear panels, butt each panel end to end. Hang upper lip of panel
over tabs located on the top panels of the machine. Swing the bottom of the panel
down and snap the lower panel clips under the frame.
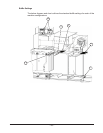
Calibrating the Electric Booster Thermostat
When installing the lower trim panels on the front of the machine, butt each panel
end to end. With the bottom of the panel held out on a 45° angle (Fig. 43), hang the
upper lip of the panel over the hooks located just below the doors (Fig. 44). Swing
the bottom of the panel down and snap the lower panel clips under the frame.
NOTE: This procedure only needs to be followed once during initial setup.
NOTE: This procedure may be followed during the 20 minute period in the “Adjusting
the Conveyor Take-Up Unit (Load Section)” procedure.
NOTE: This procedure should only be followed if the machine is operational and
theboostercanbepoweredonwithhotwaterofatleast105°Fowingintoit.
For the internal Hobart booster (18KW), the controlling thermostat needs to be
calibrated to the conditions at the customer’s site. The calibration is automatic while
the machine is running.
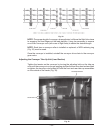
To begin calibration, ensure the booster’s circuit breaker is set to the “ON” position
and power is present at 24CON. Start the conveyor running. Block the upper photo
detector for at least 20 minutes.
NOTE: Do not put ware or any other item on the conveyor during the procedure.