


– 24 –
9. Replace the thumb screw and O-Ring into the cleaning port. If the head of the thumb screw fails
to seat against the O-Ring, check and correct the alignment of the valve opening to the cleanout
port.
10. Plug the cord back into the upper portion of the solenoid and twist clockwise to ensure a good
connection.
Kettle Tilt Lid
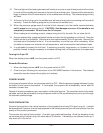
Clean the kettle tilt lid weekly.
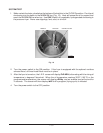
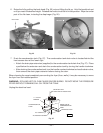
1.
Remove the tilt lid assembly. To remove, slide the tilt lid clear of the overarm post catch (see Fig. 23),
and remove pivot post knurled cap (see Fig. 23). Pull the back knob at the left, and lift up on the
lid until the overarm bar clears the pivot post.
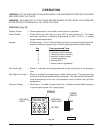
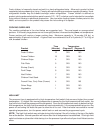
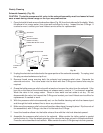
2. Remove the O-Ring from the underside of the kettle lid by prying it loose at one point with a plastic
knife (Fig. 30) or other blunt, thin tool. Avoid slicing or gouging the O-Ring. Wash the O-Ring
separately in warm, soapy water, then rinse thoroughly and dry with a soft, clean cloth.
CAUTION: Never use a metallic or sharp instrument to remove or insert the O-Ring.
3. Wash the lid assembly in warm, soapy water. Rinse thoroughly and dry with a soft, clean cloth.
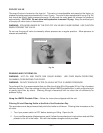
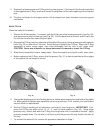
4. Before replacing the O-Ring, ensure that the groove (Fig. 31) is free of particles and the edges
of the groove are not sharp or burred.
Fig. 30 Fig. 31
5. The flexible diaphragm of the lid locking device is visible when viewing the underside of the kettle
lid. Make certain the diaphragm material is not torn or punctured. If it is, contact your local Hobart
service office for replacement.
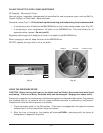
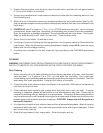
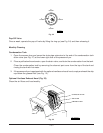
6. Dip the O-Ring in cooking oil for lubrication, and insert it into the groove. IMPORTANT: First,
press the O-Ring into place at the 12-, 6-, 3-, and 9-o'clock positions (Fig. 32). Using finger
pressure only, stretch and work the O-Ring into the groove until it is seated all around. Apply
pressure straight down. Do not twist or roll the ring into the groove; this may fracture the skin of
the ring.
7. To reinstall the kettle tilt lid, reverse the procedure described in Step 1.
PL-40909
PL-40910