


– 9 –
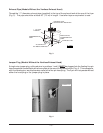
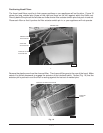
3. Remove and retain two 10-32 pan head screws from the left side panel on the upper rear of the
cabinet and two from the upper rear right side of the cabinet (Fig. 8).
4. Remove the hood from the skid.
• Remove four screws at the rear of the hood.
• Remove two screws from the right side and two screws from the left side of the hood.
5. With two people, lift the hood from the skid and place it on top of the pressure fryer.
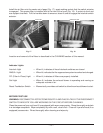
6. While one person holds the hood in place, line up the holes of the pressure fryer with the holes
in the hood. Start the four side screws (supplied) first.
7. Slide the drilled spacer bar under the rear overhanging lip of the hood and secure, using the four
rear screws.
8.
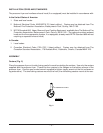
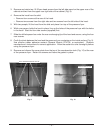
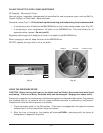
Caulk the joints between the hood and the pressure fryer countertop on the inside surface (Fig. 9).
Use silicone rubber adhesive sealant (General Electric RTV108, or equivalent). Observe
manufacturer's instructions for correct application. Allow the sealant to cure thoroughly before
using the pressure fryer.
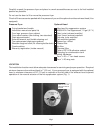
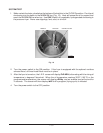
9. Remove and discard the cover plate from the top of the condensation tank (Fig. 10) at the rear
of the pressure fryer. Retain the screws and leave the gasket in place.
Fig. 9 Fig. 10
PL-41458-1
APPLY ADHESIVE SEALANT RTV108
PL-41459-1
REMOVE COVER PLATE