


– 26 –
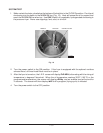
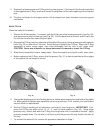
1. Push in the bottom of the grease filter. Using the handles, tilt the top of the filter forward and
remove the filter. Scrub the grease filter in warm, soapy water; rinse, drain and towel dry.
2. Push in the bottom of the air filter. Tilt the top of the filter forward and remove the filter. Scrub
the air filter in warm, soapy water; rinse, drain and towel dry.
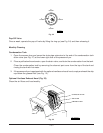
3. Push in the bottom of the charcoal filter. Using the handles, tilt the top of the filter forward and
remove the filter. When the charcoal filter needs to be cleaned, remove the charcoal from the
filter. Remove the four screws from the filter frame, being careful not to spill the charcoal.
Remove the frame end piece. Pour the charcoal from the filter and save it for future reuse.
Replace the frame end piece and four screws. Scrub the empty filter frame in warm, soapy water;
rinse, drain and towel dry. Remove the frame end piece again (four screws). Put the charcoal
back in the frame; use either old or new charcoal, as required. Replace the frame end piece and
four screws.
4. Scrub the hood interior and tray with warm, soapy water, nylon pad, or Scotchbrite, as required.
5. Reinstall the charcoal filter, the air filter, and the grease filter. Make sure the filters fit correctly
(see POSITIONING HOOD FILTERS in this manual). Your appliance will not operate unless all
three filters are properly installed.
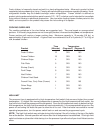
Replacement activated charcoal may be purchased from your local Hobart sales and service office.
The charcoal used in the charcoal filter is coconut-activated charcoal, 4" x 8" mesh. Approximately
9 pounds (4 kg) is required to refill the filter. Recommended replacement schedule is approximately
once every 4 months of normal use.
MAINTENANCE
WARNING: THE PRESSURE FRYER AND ITS PARTS ARE HOT. BE VERY CAREFUL WHEN
OPERATING, CLEANING OR SERVICING THE PRESSURE FRYER.
WARNING: DISCONNECT ELECTRICAL POWER SUPPLY AND PLACE A TAG AT THE DISCONNECT
SWITCH TO INDICATE YOU ARE WORKING ON THE CIRCUIT BEFORE SERVICING THE PRESSURE
FRYER.
O-RING SEAL REPLACEMENTS
Removal and replacement instructions for the lid O-Ring are described in WEEKLY CLEANING —
KETTLE TILT LID (page 24).
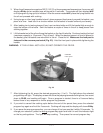
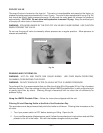
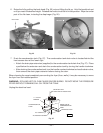
The O-Ring seals on the kettle pressure-relief valve assembly (see Fig. 28) need to be replaced if oil
is leaking from the kettle lid. If steam leaks around the kettle pressure-relief valve O-Rings and goes
into the exhaust tank, pressure will not build in the kettle. Dip the new O-Rings in cooking oil for
lubrication and insert them into the pressure-relief valve assembly.
The O-Ring seal on the clean-out port thumb screw (see Fig. 28) needs to be replaced if liquid is leaking
around the screw.
SERVICE AND PARTS INFORMATION
Contact your local Hobart servicer.