


—
r3
F
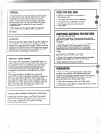
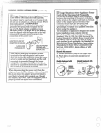
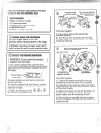
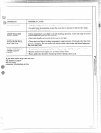
Note: C)nsome modelsthe shut-off valve
-t?
may be in a different location.
%
Lever shownclosed.
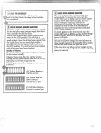
E it is this regulator:
1. Removecap and forciblysnap out plastic
plunger from bottom of cap.
~. Turn plunger overand forciblysnap back in
originallocation.Note: Plunger must snap into
position;the gas type you are convertingto must
be visibleon lower side ofplunger.
3. Reinsert the assembly into the regulator.
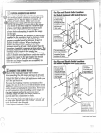
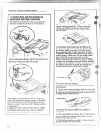
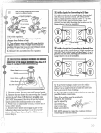
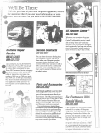
Burner Cap
‘Urn:”::
I
Burner
Orifice
Gas inlet
1
Le~-
~. ... .
1. Removegrates, burner caps and burner heads.
2. Removeburner bases by unscrewing the 3 small
screws in each base. M burner stidght out,
DO ~i~~ disconnect the wires from the bt~rner
bases unless the cooktop needs to be raised.
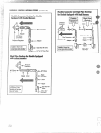
3. l~ith 7mm or adjustable wrench, remove the 4
;31’5ssorifice Sptlcls.
4-.Install orfilce spuds according to one of‘the
followingdi;]g-l-a~ns(see box
❑ or ❑), for IJP
~Q~~r ~~aturalgas, depending on which
yOU al-e
gonverti~~g to.
————...
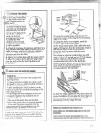
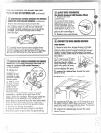
LP orificespuds are in a smallplasticbag packed
withthis Use a~d Care book.LPor~~eespuds
have a 2-digitnumber and the htter “U’on one
side. Each orificespud willalsohave 1or 2
grooves on one side, denotingthe locationonthe
range where it is to be i~~stalled.
Naturalgas orificespuds have a 3-digitnumber on
one side. Each orificespud willalsohave 1,2 or 3
grooves on one side, denoting the locationon the
range where it is to be installed.
5. To prevent leakage, make sure the or~~ce
spuds are securely screwed into the gas ir~let
tubes. Use a smallwrench to hold the inlettube
hex to prevent it froIMtwisting.
6. Put old orifice spuds back in the bag to save for
possible fiture conversion.
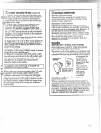
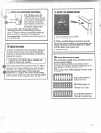
Note: If an orifice spud is accidently
dropped, the cooktop
can be raised bv
:\gl
——————
disengaging -
the 2 front clips
with a large flat
*~p”
.
1
blade scr=wdtiver.
‘, j II
DO
NOT attempt to raise the cooktop without
removing all 4 burner bases.
..=---,+.
,
;
... .
--_.-~
-.
,--”
i
1
. .—.-—.-—-—.———...
. ...- ...