


before plugging in
●
M
ake sure your electricity supply is the same as the one
shown on the underside of your appliance.
●
WARNING: THIS APPLIANCE MUST BE EARTHED.
●
This appliance conforms to EC directive 2004/108/EC on
E
lectromagnetic Compatibility and EC regulation no.
1
935/2004 of 27/10/2004 on materials intended for contact
with food.
before using for the first time
1 Remove the plastic blade covers from the knife blade. Take
care the blades are very sharp. These covers should
be discarded as they are to protect the blade during
manufacture and transit only.
2 Wash the parts see ‘care & cleaning’
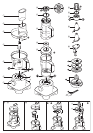
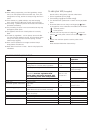
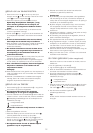
key
processor
ቢ pusher
ባ feed tube
ቤ lid
ብ detachable drive shaft
ቦ bowl with drive shaft
ቧ power unit
ቨ speed/pulse control
ቩ safety interlocks
ቪ cord storage (at back)
liquidiser
ቫ blade unit
ቭ sealing ring
ቮ goblet
ቯ filler cap
ተ lid
glass multi mill (if supplied)
ቱ jar
ቲ sealing ring
ታ blade unit
attachments
Not all of the attachments listed below may be included with
your food processor. Attachments are dependent upon the
model variant.
ቴ knife blade
ት dough tool
ቶ twin beater geared metal whisk
thick slicing/coarse grating disc
thin slicing/fine grating disc
rasping/parmesan disc
citrus juicer (if supplied)
spatula
to use your food processor
1
Fit the bowl by aligning the on the bowl with the on the
p
ower unit, turn clockwise ᕡ until it locks .
2
Fit an attachment over the bowl drive shaft.
Note: Detachable drive shaft ብ should only be
f
itted when using the discs, citrus juicer or twin
b
eater geared whisk.
●
A
lways fit the bowl and attachment onto the processor
before adding ingredients.
3 Fit the lid ᕢ - ensuring the top of the drive shaft/tool locates
into the centre of the lid.
●
Do not use the lid to operate the processor,
always use the on/off speed control.
4 Plug in, switch on and select a speed. (Refer to the
recommended speed chart).
●
The processor will not operate if the bowl or lid
are not fitted correctly into the interlock. Check
that the feed tube and bowl handle are situated
to the right hand side.
●
Use the pulse (P) for short bursts. The pulse will operate for
as long as the control is held in position.
5 Reverse the above procedure to remove the lid, attachments
and bowl.
●
Always switch off and unplug before removing the
lid.
important
●
Your processor is not suitable for crushing or grinding coffee
beans, or converting granulated sugar to caster sugar.
●
When adding almond essence or flavouring to mixtures avoid
contact with the plastic as this may result in permanent
marking.
to use your liquidiser
1 Fit the sealing ring ቭ into the blade unit ቫ - ensuring the
seal is located correctly in the grooved area.
●
Leaking will occur if the seal is damaged or
incorrectly fitted.
2 Hold the underside of the blade unit ቫ and insert the blades
into the goblet - turn anti-clockwise until it clicks ᕣ. Refer to
the graphics on the underside of the blade unit as follows:
- unlocked position
- locked position
The liquidiser will not operate if incorrectly
assembled.
3 Put your ingredients into the goblet.
4 Fit the lid onto the goblet and turn clockwise ᕤ until it clicks.
Fit the filler cap.
5 Place the liquidiser onto the power unit, align the on the
liquidiser with the on the power unit and turn
clockwise ᕥ to lock .
●
The appliance will not operate if the liquidiser is
incorrectly fitted to the interlock.
6 Select a speed (refer to the recommended speed chart) or
use the pulse control.
4
slicing grating disc
●
Never remove the lid until the cutting disc has completely stopped.
●
Handle the cutting discs with care - they are extremely sharp.