


C–6 16023522 ©2004 Maytag Services
Conversion Instructions (Model CPR1100AD*)
2
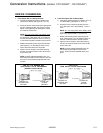
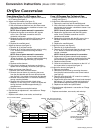
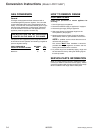
Gas Type Screw Type Head Number
Natural Bypass 76
LP Bypass 51
Natural Pilot 31
LP Pilot 15
Orifice Conversion
From Natural Gas To LP/Propane Gas:
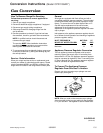
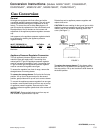
a. Change the appliance pressure regulator from Natural
to LP setting (see figure 1).
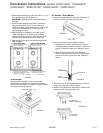
b. Adjust oven thermostat (see figure 2).
1. Remove the main top and the manifold panel.
2. With a flat blade screwdriver turn pilot flame screw
and bypass screw counter- clockwise to loosen. Use
pliers to remove screws.
NOTE: Save all parts removed in conversion.
3. Replace the bypass screw with the #51 bypass
screw. Use a flat blade screwdriver and turn
clockwise until seated.
4. Replace the pilot screw with the #15 screw. Use a
flat blade screwdriver and turn clockwise until
seated.
5. Replace the manifold panel.
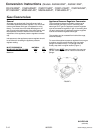
c. Adjust top burners (see figure 3).
1. Remove all (4) surface burners.
2. Remove all (4) orifice hoods from the valve by using
a1/2² wrench or socket and turning the hood
counter- clockwise.
NOTE: Save all parts removed in conversion.
3. Replace with the brass colored hoods stamped
.85mmbyusinga1/2² wrench or socket and turning
the hood clockwise approximately (6) complete
turns.
4. Replace surface burners.
5. Open the air shutters on the burners so that the
square hole is completely uncovered (see figure 6).
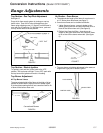
d. Adjust oven burner (see figure 4).
1. Remove oven racks and oven bottom.
2. Remove the oven burner by removing the screw
from the pilot bracket and the oven burner bracket
(see figure 4). Use caution in removing pilot bracket.
3. Remove orifice hood with 1/2² wrench or socket by
turning counter-clockwise.
4. Replace with orifice hood with a black stripe
stamped 1.3 mm using a 1/2² wrench or socket and
turning the hood clockwise approximately (6)
complete turns.
5. Replace oven burner and pilot bracket.
e. Pilot and burner adjustments - see section on “Range
Adjustments”.
f. Replace oven bottom, oven racks, and main top.
From LP/Propane Gas To Natural Gas:
a. Change the appliance pressure from LP to Natural
setting (see figure 1).
b. Adjust oven thermostat (see figure 2).
1. Remove the main top and the manifold panel.
2. With a flat blade screwdriver turn pilot flame screw
and bypass screw counter- clockwise to loosen. Use
pliers to remove screws.
NOTE: Save all parts removed in conversion.
3. Replace the bypass screw with the #76 bypass
screw. Use a flat blade screwdriver and turn
clockwise until seated.
4. Replace the pilot screw with the #31 screw. Use a
flat blade screwdriver and turn clockwise until
seated.
5. Replace the manifold panel.
c. Adjust top burners (see figure 3).
1. Remove all (4) surface burners.
2. Remove all (4) orifice hoods from the valve by using
a1/2² wrench or socket and turning the hood
counter- clockwise.
NOTE: Save all parts removed in conversion.
3. Replace with the brass colored hoods stamped
.54byusinga1/2² wrench or socket and turning the
hood clockwise approximately (6) complete turns.
4. Replace surface burners.
5. Close the air shutters on the burners so that 1/4² of
the square hole is covered (see figure 4).
d. Adjust oven burner (see figure 4).
1. Remove oven bottom.
2. Remove the oven burner by removing the screw
from the pilot bracket and the oven burner bracket
(see figure 4).
3. Remove orifice hood with 1/2² wrench or socket by
turning counter-clockwise.
4. Replace with orifice hood with a brass hood stamped
#46usinga1/2² wrench or socket and turning the
hood clockwise approximately (6) complete turns.
5. Replace oven burner and pilot bracket.
e. Pilot and burner adjustments - see section on “Range
Adjustments”.
f. Replace oven bottom, oven racks, and main top.
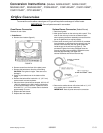
PILOT FLAME SCREW
BYPASS SCREW
ORIFICE - Nat.: Brass Stamped #54
LP: Brass Stamped .85mm
FIGURE 2
FIGURE 3
FIGURE 4
ORIFICE
LP: Black Stripe S tamped 1.3mm
Nat.: Brass Stamped #46
AIR SHUTTER
OVEN
BURNER
SCREWS