


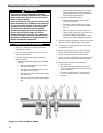

STARTING THE BOILER
A. CHECK THE PIPING
1. Water and Steam Piping
a. The Boiler must have been hydrostatically tested.
b. Check the attached piping for joint tightness.
c. Continue monitoring as you proceed through
start up.
2. Gas Piping
a. Make sure the gas system piping and the
connections to the boiler Gas Control Train(s)
have been leak tested.
b. After the boiler is in operation, check the
tightness of all joints in the boiler gas piping with
a soap suds solution.
c. Purge the gas piping of all air up to the boiler
Gas Control Train.
B. FILL THE BOILER
1. Fill the boiler to the normal water line.
a. Gravity Systems and Pumped Return with
Condensate Units Fill to 40-1/2" (103 cm) above
the boiler foundation (center of gauge glass).
b. Pumped Return with Boiler Feed Unit–Fill the
boiler using the boiler feed unit. Fill level will
depend on the control being used, but should be
40-1/2" (103 cm) above the boiler foundation
(just below center of gauge glass) when the
pump stops.
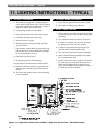
C. STUDY LIGHTING INSTRUCTIONS
1. Before starting the boiler, study the Lighting
Instructions supplied with the boiler.
D. RUN PILOT CHECK-OUT
1. Shut off all electrical power to the boiler.
2. Close Main and Pilot gas shut-off valves. Wait for
five (5) minutes.
3. Set the Operating and Limit Pressure Controls to
minimum setting so they will not call for heat.
4. Perform Pilot Check:
a. Turn main electric disconnect switch to the ON
position.
b. Turn up the settings on the Operating and Limit
Pressure Controls so they will call for heat.
c. Check for a continuous spark at the electronic
spark-ignited pilot(s).
d. Electronic spark-ignited pilot systems–The control
will spark for 15 seconds (trial for ignition), then
shut down for a 5 to 6 minute wait period before
attempting another ignition.
e. Electronic standing pilot systems–Within 15
seconds the control will click, indicating a safety
lockout.
f. Turn down the Operating Pressure Control to
stop the call for heat.
g. Wait 60 seconds to allow the control to reset
before proceeding with the next step.
5. Light Manual Pilots
a. Follow the procedure in the Lighting Instructions
to manually light any standing pilots.
6. Electronic Spark-Ignited Pilot Ignition Check
a. Turn up the Operating Pressure Control for a call
for heat.
b. The electronic spark-ignited pilot(s) should ignite.
c. Turn down the Operating Pressure Control to
stop the call for heat.
d. The spark-ignited pilot(s) should shut off.
7. Check Main Burner Ignition
a. With the Operating Pressure Control turned
down, open the main gas shut-off valve(s).
b. Turn up the Operating Pressure Control for a call
for heat.
c. The electronic spark-ignited pilot(s) should ignite.
d. The main gas valves will then open and the main
burners should ignite.
e. Turn down the Operating Pressure Control to
stop the call for heat.
f. The electronic spark-ignited pilot(s) and main
burners should shut off.
E. CHECK MAIN BURNER SYSTEM
1. Remove the pressure test plug at the Main gas shut-
off valve. Attach a U-tube manometer.
2. Restart the boiler by turning up the Operating
Pressure Control for a call for heat.
3. Leak test all gas train joints with a soap suds
solution.
4. Check the gas pressure at the entrance to the Gas
Control train.
a. The pressure reading under flow should be
between 5 and 14 inches water column (1.7 and
3.5 kPa).
b. If the pressure to the Gas Control Train exceeds
14 inches (3.5 kPa) under any conditions, the
system must be provided with a lockup type gas
pressure regulator to provide 14 inches (3.5 kPa)
maximum.
5. Check the Manifold gas pressure.
a. Remove the 1/8" pipe plug from the manifold gas
pressure tapping.
b. Attach a U-tube manometer.
c. Adjust the Main Gas Pressure Regulator to obtain
3.5 inches water column (.9 kPa) on Natural Gas
10 inches water column (2.5 kPa) on Propane
(LP) Gas.
d. NOTE: If the pressure is adjusted to set the
nameplate input to the boiler, do not set it more
than 0.3 inches (75 Pa) plus or minus from the
specified settings. If more adjustment to the rate
is needed, it must be done by changing the
burner gas orifices.
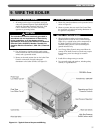
10. STARTING THE BOILER
40