


STARTING THE BOILER
e. The Minimum input rate listed on the nameplate
applies to boilers with staged firing rate. This
minimum rate is not adjustable. It is controlled
by an orifice in the gas train.
6. Check the burner input by reading the gas meter.
a. Each of the burners is rated at 105,000 Btu/hr
(30.8 kW) for Natural Gas with a 0.60 specific
gravity.
b. Each of the burners is rated at 102,500 Btu/hr
(30 kW) for Propane (LP) Gas with a 1.56
specific gravity.
c. (U.S.) Determine the input by multiplying “F” –
Meter Reading (Cubic Feet of Gas) times “H” –
Heating Value of Gas (Btu per Cubic Foot) times
3600. Divide by “T” – the time in seconds at the
meter reading.
(Metric) Determine the input by multiplying “F”–
Meter Reading (Cubic Meters of Gas) times “H” –
Heating Value of Gas (Joules per Cubic Meter).
Divide by “T” – the time in seconds of the meter
reading.
d. Note: If the meter is not automatically corrected
for temperature and pressure, the meter reading
must be corrected to actual conditions during the
rate test.
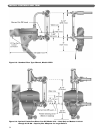
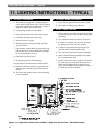
7. Adjustment of Primary Air
a. A bag of air adjustment screws is provided with
the boiler, attached to one of the burners with
pilot bracket.
b. Primary air adjustment is not normally required.
c. If primary air adjustment is needed, insert the
self-tapping screws into the holes located on the
top front of the burners.
d. Turn the screws in all the way until yellow flame
tips appear. Turn the screws back out until the
yellow tips disappear.
F. CHECK BOILER CONTROLS
1. Limit and Operating Pressure Controls
a. Lower the setting of each control until the
burners shut down.
2. Low Water Cut-offs
a. Lower the water level in the boiler to below the
control cut-off level. The burners should shut down.
3. Main Burner Shut-Off Valve(s)
a. Close Main Burner Shut-Off Valve(s).
b. The burners should shut down.
4. Check all controls to make sure they function correctly.
5. After all controls have been proven, set the Operating
and Limit Pressure Controls to the pressures desired.
G. CLEAN THE BOILER
1. Clean the boiler as described below no later than
one week after the initial start-up. Cleaning will be
more effective if the boiler operates a day or two to
loosen sediment and impurities in the system.
2. The boiler must be cleaned to remove any
accumulation of oil, grease, sludge, etc. that may be
in the system. These substances can cause foaming
and surging of the boiler water, producing an
unstable water line and water carryover to the system.
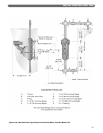
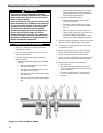
3. The piping for a skim valve must be done as shown
in Section 5, “Pipe the Boiler,” of this manual, with
the skim valve mounted off of one of the end riser
connections.
4. Connect a 2 inch drain line off of the skim valve, run
to a point of safe discharge.
5. Close all valves to the system. Provide a means of
continuous fresh water to the boiler for the cleaning
process.
6. Use common washing soda (such as Arm and
Hammer Super Washing Soda). Mix the soda with
water in a 10 quart (9.5 liter) pail and pour into the
boiler through the safety valve tapping. Use a
proportion of one (1) pound (.5 kg) of washing soda
for each 800 square feet (74 m²) EDR net boiler rating.
7. Open the skim valve. Fill the boiler until water begins
to flow out the valve.
8. Turn burners on and allow the boiler water to heat
up to just below steaming [180 to 200ºF (82 to
93ºC)]. Cycle the burners to maintain temperature
during skimming. Do not allow the boiler to steam.
Steaming mixes up the contaminants in the water
instead of floating them at the surface.
9. Open the make-up water valve to continuously feed
water to the boiler. Allow water to flow out of the
skim tapping.
10. Continue skimming the boiler until the water flowing
from the skim tapping flows clear. This will take
some time, possibly several hours for a dirty system.
11. After skimming is complete, close the skim valve and
turn off the boiler.
12. Close the make-up water valve and open the boiler
blowdown valves.
13. Drain the boiler completely. Then refill and drain
again one or two times to make sure all of the soda
has been washed out.
14. Restore piping to normal. Pipe a nipple and cap in
the skim valve.
15. Note: If the gauge glass becomes dirty again, this
indicates more contaminants have worked loose in
the system. Repeat the cleaning and skimming
process as needed to clean the system.
Rate, Btu/Hr =
F x H x 3600
T
Rate, Watts =
F x H
T
Cleaning the boiler requires the use of very hot water
and corrosive chemicals. Use care when handling to
prevent injury.
WARNING
41
Do not leave the boiler unattended while firing.
Take great care not to allow the water level to drop
below the bottom of the gauge glass or to allow fresh
water make-up to flow in too fast. This will avoid the
possibility of causing the boiler sections to fracture.
CAUTION