


31
MODEL 430 INSTALLATION INSTRUCTIONS
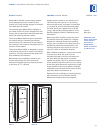
Sub-Zero allows a
1
/4" (6) space to slide the
backing material into place on the door frame.
Requirements for proper fit and appearance
are;
5
/8" (16) minimum overall thickness, .10"
(3) wide groove between backer portion and
overlay portion of panel, finished inside edge
and 25 lbs (11 kg) maximum weight. See the
Wine Storage section of the Sub-Zero Design
Guide for additional panel information.
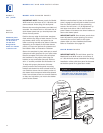
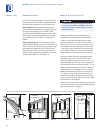
IMPORTANT NOTE:
The size of the overlay
panel is critical. It must fit over the door frame.
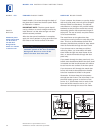
To install overlay panels, first remove the
magnet backed trim molding using a piece of
tape to pull it away from the frame and expose
the frame screws. The molding will bend at the
center so that you can remove it.
Remove the frame by removing the five screws
holding it in place. The door channel is now
r
eady to accept the overlay panel. Slide the
panel into the frame on the door. With the
panel in position, replace the frame end. Be
sure the panel is inserted completely into the
channel for proper fit and alignment. Next,
replace the trim molding by inserting the top,
then the bottom into the frame channel.
Release the middle and set the magnets.
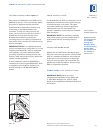
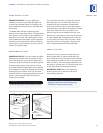
Install the #8 x
5
/8" screws through the back of
the glass door frame into the door panel.
IMPORTANT NOTE:
Install screws in all the
mounting holes in the door frame. The nature
of the door panel with a narrow outer rim and
no connecting center member requires the
support provided by the glass door.
After the door panel installation is complete,
apply the cover patches or plugs pr
ovided over
the holes on the inside surface of the door.
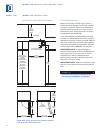
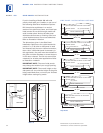
OVERLAY GRILLE PANEL
If you have not already removed the inner and
outer grille frame for moving the unit, remove
the inner grille panel assembly, see Grille
Removal on page 26. Remove the top two
corner screws and pull away the top frame.
Slide the panel into position in the grille frame.
If you are using a grille panel
1
/4" (6) or thinner,
you will need to install a filler.
Reattach the top frame by reinstalling the two
top corner screws. Install the inner grille panel
assembly onto the unit.
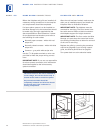
The wine storage unit door is made with
a sealed double wall tempered glass core.
The drill must not contact this core when
drilling. Be sure the hole is centered on
the small groove in the front of the door
frame and the drill passes squarely
through the frame. If you are inexperi-
enced with drilling, fasten the handle from
t
he rear of the door panel only.
The cover patches or plugs are part of the
insulation system on the door of the Wine
Storage unit. Be sure to cover all the
holes in the door that were used.
A solid panel must not be installed on a
glass door unit, as this may cause
moisture to form behind the panel.
MODEL 430