English 8
Installation Instructions
Wall Mount Installation
Installation Specifications
Figure 6 shows a typical installation of the hood with a duct
cover. Accessory 6” (152 mm) and/or 12” (305 mm) duct
covers are used to fill the space between the hood and
ceiling (available for purchase separately).
The installation height ranges from a minimum height of 30”
(762 mm) to a maximum height of 40” (1016 mm); however,
it is necessary to follow the cooking appliance
manufacturer’s installation instructions for proper hood
height. In Figure 6 one 6" (152 mm) duct cover has been
used in this installation. Add or subtract duct covers as
appropriate to accommodate ceiling height and
recommended hood height.
The duct cover structure is supported by the hood.
NOTICE:
The hood could incur some damage from heat if a
THERMADOR PROFESSIONAL
®
series range or
rangetop is operated with multiple burners at high settings
under a hood that is installed at minimum clearances.
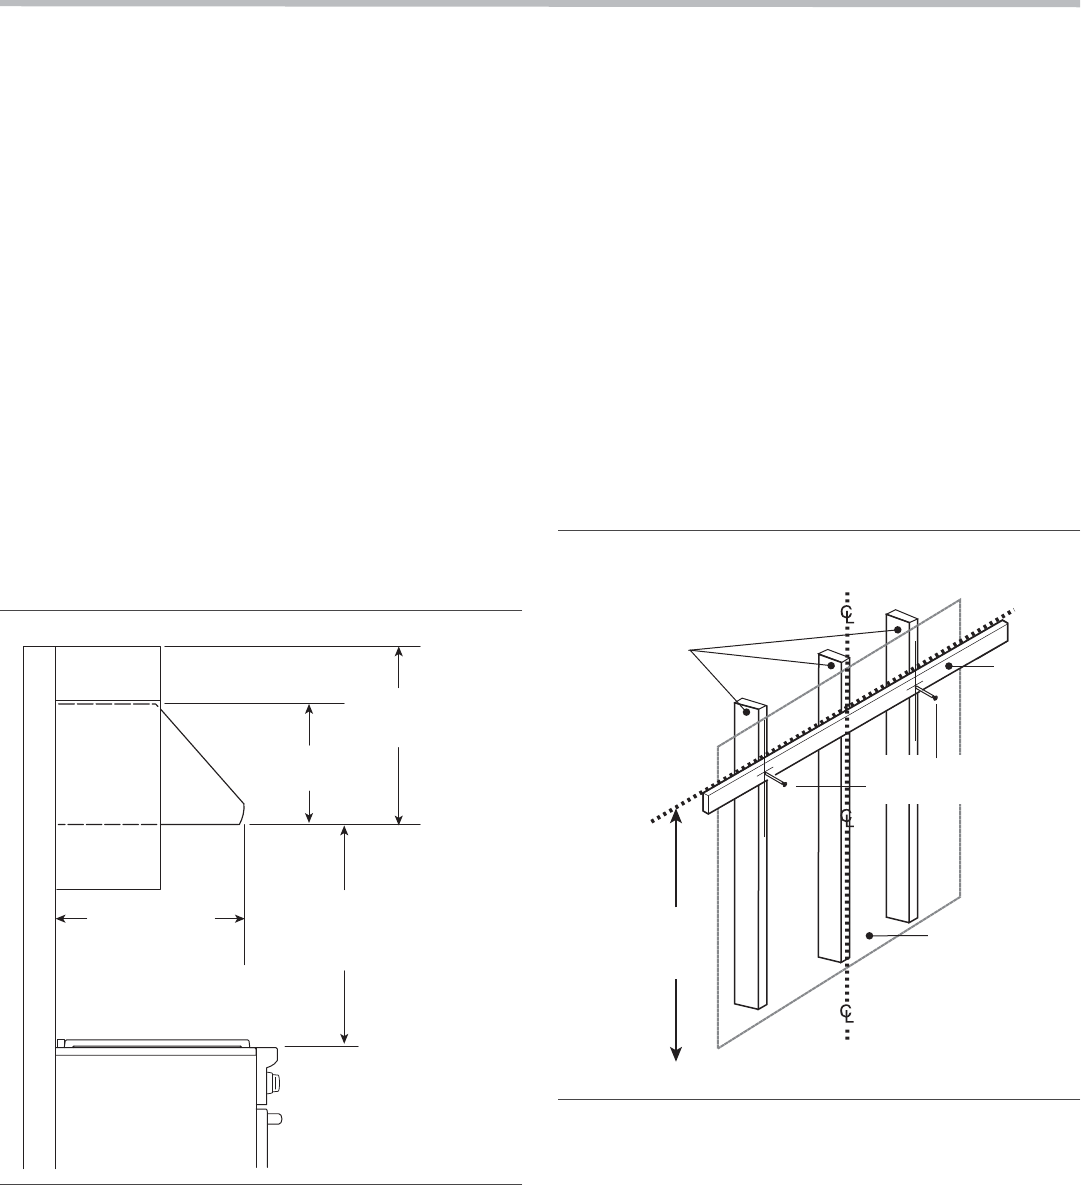
1. After the hood installation height has been determined,
draw a horizontal line at a distance above the cooktop
equal to the recommended hood installation height
plus 15½” (394 mm). This line is the mounting location
of the wooden bracket shipped with the hood.
2. Find the centerline of the hood. Draw a vertical line
along this centerline up to the horizontal line drawn in
Step 1.
3. The hood is mounted to the wall using the wooden
bracket shipped with the hood. Remove the wooden
bracket located at the top side of the hood by removing
the two shipping screws. Mark the center line of the
wood bracket.
4. Locate a stud on both sides of the hood centerline to
use for mounting the wooden bracket as shown in
Figure 7.
5. Align the top of the wood bracket along the horizontal
line drawn in Step 1. Align the centerlines of the
bracket and cooktop.
6. Drill a 3” (76 mm) deep 3/16” (3 mm) tap hole through
the wooden bracket, wall, and into the stud.
7. Use (2) or (3), depending on model, 3” (76 mm) screws
to attach the bracket to the wall, as shown in Figure 7.
For support of longer hoods, use three studs.
Countersink the screw heads to prevent interference
with the hood.
Figure 6: Typical Hood Installation
24” (610 mm)
or 27” (687 mm)
Hood Depth
18”
(457 mm)
24”
(610 mm)
6” Duct
Cover
Hood mounting Heights
Minimum 30” (762 mm)
Maximum 40” (1016 mm)
*Follow cooking
appliance manufacturer’s
recommendations
Figure 7: Mounting the Wooden Bracket
Drywall
To Cooking Surface
Recommended
Hood Height
15½” (394 mm)
Cooktop Centerline
Wood
Bracke
Wall Studs
Screws 2 ea
3” (76 mm)


