


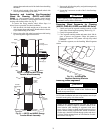


Manufacturer reserves the right to discontinue, or change at any time, specifications or designs without notice and without incurring obligations.
Catalog No. 04-53620007-01 Printed in U.S.A. Form 62E-C1SI Pg 38 8-10 Replaces: New
Copyright 2010 Carrier Corporation
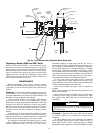
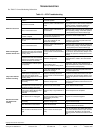
TROUBLESHOOTING
See Table 13 for troubleshooting information.
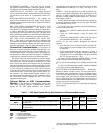
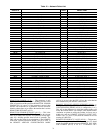
Table 13 — ERV Troubleshooting
SYMPTOM POSSIBLE CAUSES ACTION TO CHECK POSSIBLE REMEDY
ERV will not turn on
Disconnect switch is in the off
position
Verify that the disconnect switch is
in the 'ON' position
Move the disconnect lever to the 'ON'
position.
No power to the ERV
Check for power at the disconnect
switch
Using a volt meter verify that the voltage
being supplied to the ERV matches the ERV's
operating voltage. If the ERV operates on
three phase power check all three legs.
One or more blown fuses
Check for power at the bottom of
the fuse block
Using a volt meter verify that the voltage on
the bottom side of the fuse block matches the
ERV's operating voltage. If the ERV operates
on three phase power check all three legs.
Control board transformer circuit
breaker is tripped
Look at the small transformer next
to the control circuit board to see if
the black circuit pushed out
Depress the circuit breaker back in.
ERV is running but
blowers will not turn
The fan speed / CFM level is set
too low
Use the user interface push button
to view the 'Outside Air' and
'Exhaust Air' settings
Adjust the fan speed / CFM demand levels by
pressing the user interface push button and
turning the adjust knob.
One or more blown fuses
Check for power at the bottom of
the fuse block
Using a volt meter verify that the voltage on
the bottom side of the fuse block matches the
ERV's operating voltage. If the ERV operates
on three phase power check all three legs.
Rooftop Economizer Option (if
equipped) has shut down the ERV
because the rooftop unit is in 'Free
Cooling' mode
Check for continuity across the
mercury switch on the economizer
damper.
Using a continuity meter check for continuity
across the two wires that connect to the mer-
cury switch on the economizer damper. If the
contacts are open, the rooftop unit is in 'Free
Cooling'.
Smoke Detector Option (if
equipped) has shut down the ERV
because it is sensing smoke in the
exhaust airstream on the ERV.
Check for wiring errors.
Using the wiring schematics verify that the
smoke detector is wired to the control board
properly.
Low Temperature Lockout Option
(if equipped)
Check to see if the outside temper-
ature is above –30 F
(–34.4 C). Check for wiring errors
Use a thermometer to measure the outside
temperature. Use the wiring schematics to
verify that temperature probe on the intake air
side of the ERV is wired properly.
Only one of the two
blowers is turning
The fan speed / CFM level is set
too low
Use the user interface push button
to view the 'Outside Air' and
'Exhaust Air' settings
Adjust the fan speed / CFM demand levels by
pressing the user interface push button and
turning the adjust knob.
Rooftop Economizer with Power
Relief Option (if equipped) has
shut down the supply blower
because the rooftop unit is in 'Free
Cooling' mode
Check for continuity across the
mercury switch on the economizer
damper
Using a continuity meter check for continuity
across the two wires that connect to the mer-
cury switch on the economizer damper. If the
contacts are open, the rooftop unit is in 'Free
Cooling'.
One of the blowers is wired
incorrectly
Check for wiring errors.
Using the wiring schematics verify that both
the power wires and the control wires are con-
nect properly.
The ERV Standard Frost Protec-
tion Option has turned off the sup-
ply blower to defrost the wheel
Check for frost on the wheel. Wait for Defrost mode to finish.
Blowers are on but
the wheel is not
turning
The ERV Enthalpy Control, Dry
bulb Control / Wheel Bypass Stop /
Jog Option (if equipped) is
activated
Check for Stop / Jog movement of
wheel.
Wait until sequence is completed.
The wheel motor is unplugged.
Check to see if the connector
between the wheel motor and the
cabinet wiring is securely
connected.
Plug the two connectors together.
The wheel motor is wired
incorrectly.
Check for wiring errors.
Compare the wheel motor, control board and
relay are wired correctly.
The wheel belt is off or broken Check the wheel belt.
Verify that the wheel belt is seated in the pul-
ley and on the rim of the wheel.
The air seals on the wheel are too
tight
Check to see if the wheel spins
freely.
Carefully rotate the wheel by grabbing the
outer rim and spinnig the wheel. After letting
go the wheel should continue to spin for three
to four seconds. Should the air seals need
adjusting see the maintainence section of this
book.