


Safety
9
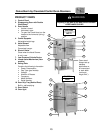
1. After initial installation, check:
a. Suction Plate (Hinged Fan Guard) for both swing and latch action.
b. Hinged Removable Pan Racks for remove, replace, and latch action.
c. Universal Rack for correct installation.
d. Loading Trolley for proper roll in and out action (floor models only).
e. Pre-heat Bridge for correct fit (floor models only).
f. Descaling port cap is on and properly tightened.
g. Test Water Supply Lines
1) Check all connections for proper tightness.
2) Remove the side panel of the Combi to inspect water connections inside the
Combi.
3) Open the water supply valves.
4) Check all lines and connections for leaks, both inside and outside the Combi.
5) If Startup and Checkout will be performed next, leave side panel off; otherwise,
replace the side panel and secure it to the Combi.
h. Test Gas Supply Lines
1) Check all connections for proper tightness.
2) Remove the side panel of the Combi to inspect water connections inside the Combi.
3) Open the gas supply valve.
4) Check all lines and connections for leaks with a soap and water solution.
5) If Startup and Checkout will be performed next, leave side panel off; otherwise,
replace the side panel and secure it to the Combi.
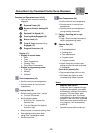
2. Turn ON the exhaust hood.
3. Turn ON the water supply valve(s).
4. Turn ON the gas supply valve(s).
5. Turn ON the Main External Power Switch.
6. Turn ON the Control Panel Service Disconnect Switch (Fig. 6-2).
7. Turn ON the COMBI with the ON / OFF key
.