17
B) TO SET THE TIMER TO SWITCH OFF
ONLY
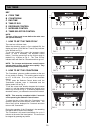
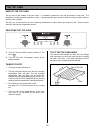
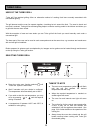
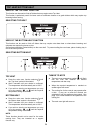
i) Ensure the electricity supply is switched ON and
that the correct time is displayed, e.g. 9.00 a.m.
as Fig. 9.
ii) Set the main oven control to the required function
and temperature.
iii) Place food in oven.
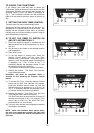
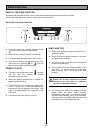
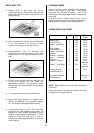
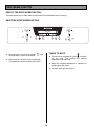
iv) To set the length of cooking time, press the
Selector Control button until the 'Cook Time'
indicator is illuminated. Press the increase control
button (+) until the required length of cooking time
is displayed, e.g. 2 hrs 15 mins as Fig. 10.
Depress the decrease control button (-) if
necessary.
v) Release the buttons. The 'Cook Time' indicator
neon will be illuminated.
vi) The main oven temperature symbol will flash until
the oven has reached the desired temperature
and then stop.
4. TO CANCEL AN AUTOMATIC
PROGRAMME
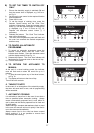
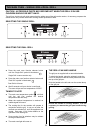
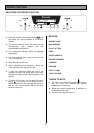
i) To cancel an automatic programme press the
Selector Control button until the 'Cook Time'
indicator neon flashes. Press the decrease control
until the display reads 0.00 as Fig. 11.
ii) Release the buttons. The 'Cook time' indicator will
flash and after 5 seconds return to the time of day.
iii) Turn off oven control.
5. TO RETURN THE APPLIANCE TO
MANUAL
At the end of a timed cooking period, the indicator
neon will flash and an alarm will sound for up to 2
minutes.
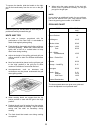
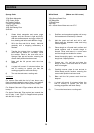
i) To stop the sound press any of the three buttons,
as Fig. 12.
ii) The display will return to the time of day.
Turn off the oven controls.
6. THINGS TO NOTE
In the event of an interruption of the electricity supply,
the timer will reset itself to zero, and all programming
will be cancelled.
7. AUTOMATIC COOKING
It is advisable to leave food in the oven for as short a
time as possible before automatic cooking. Always
ensure commercially prepared food is well within its
use by date and that home prepared food is fresh and
of good quality.
When cooking is complete, do not leave food to stand
in the oven, but remove and cool it quickly if the food is
not to be consumed immediately.
Always ensure food in the oven has been covered
before cooking if it is not possible to remove food
immediately after cooking.
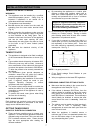
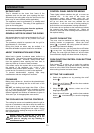
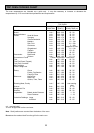
9 00
FIG. 9
9 00
2 15
11 15
180
0
FAN
COOKING
FIG. 10
9 00
0 00
9 00
180
0
FAN
COOKING
FIG. 11
0 00
0 00
180
0
12
15
FAN
COOKING
FIG. 12