


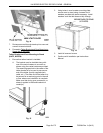
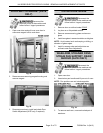

3. Remove screws and valve bracket from factory
standard utility plate.
4. Save screws and bracket. Discard original
factory standard utility plate.
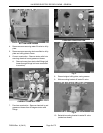
5. Remove grease-out hose from 45 degree strain
relief fitting.
Fig. 11
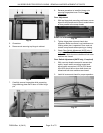
6. Install valve bracket from old plate onto new utility
plate (supplied with stand).
7. Install new utility plate assembly onto oven using
screws removed earlier.
8. Install ¾" MNPT to ¾" ID, 90 deg, Barb Hose
Fitting (not supplied) into P1 drain connection.
NOTE: P1 drain connection cannot drop through into
stand and must exit out the right side of the oven.
9. Route grease-out hose down through bottom of
machine into stand.
10. Route power cord through stand up into oven and
connect to terminal block.
11. Proceed to Tether Bracket and Oven Mounting to
Stand (KA7E, KA7EM).
KA7EM without Grease Assist (ML-137711,
ML-137714)
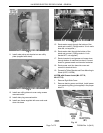
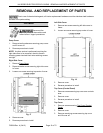
1. Remove Right Side Cover.
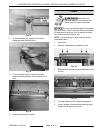
2. Remove electric power cord blank. Install power
cord restraining fitting (not supplied) in the proper
hole E1.
Fig. 12
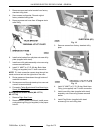
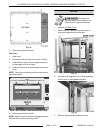
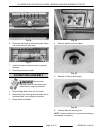
3. Remove screws from factory standard utility
plate.
Fig. 13
4. Install ¾" MNPT to ¾" ID, 90 deg, Barb Hose
Fitting (not supplied) into P1 drain connection.
5. Install new utility plate (supplied with stand)
assembly onto oven using screws removed
earlier.
6. Install Plug Button (supplied with stand
accessory) into new utility plate.
KA SERIES ELECTRIC ROTARY OVENS - GENERAL
F25294 Rev. A (0412) Page 8 of 72