


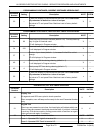
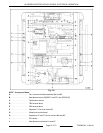


D. High limit thermostat is set to maximum and
contacts are closed.
E. Oven cavity is at room temperature.
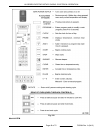
2. Power switch is turned on.
A. Power switch indicator light on.
B. Power supplied to K2 coil thru power switch
contacts and high limit thermostat contacts.
1) K2 contacts close.
C. Display shows time and the last operated
program number.
D. Step LEDs may be on if a program is
selected.
E. Oven is in idle mode.
3. Select a saved cook program (press numbered
keys 1 thru 9).
A. Any programed step LEDs for the selected
program are illuminated.
4. Press Start to run cook cycle.
A. Power applied to rotisserie motor (M3) thru
internal relay CR3 on CPU board.
B. Power applied to blower motors M4 and M5
thru internal relay CR2 on CPU board.
C. Power applied to light thru internal relay
CR1 on CPU board.
D. Power applied to heat element contactor K1
coil thru internal relay CR4 on CPU board
and power switch contacts.
1) K1 contacts close.
2) Power applied to heat elements E1,
E2, and E3 thru K1 closed contacts and
K2 closed contacts.
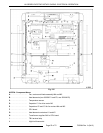
E. Display shows the number of the program
running.
F. Step LED for the cook step in progress will
blink.
G. Cook temperature for the cook step in
progress will display.
H. Total combined cook time for all steps in
the selected program will be displayed and
will count down.
5. Temperature sensor senses oven cavity
temperature.
NOTE: High limit thermostat must be set to maximum
otherwise thermostat could regulate cavity
temperature.
6. Cavity reaches programmed set temperature.
A. CPU board internal relay CR4 opens.
1) Power removed from K1 contactor coil.
a. Power removed from heater
elements E1, E2 and E3.
7. Oven continues to cycle until time expires and
beeper sounds; or add 5 min button is pressed;
or stop button is pressed.
A. Press beeper silence button to silence
beeper.
8. At the end of cook cycle, all power is removed
from M3, M4, M5, E1, E2, and E3.
9. Press Start to run the selected program again, or
select a different program to run.
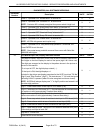
Washing Cycle Sequence of Operations
NOTE: Auto clean oven's - the grease pump cycles
on/off depending on the times entered in service
mode.
NOTE: The grey water/sump peristaltic pump was
removed from machines with Serial No. 46300096
and higher.
Criteria for starting wash cycle:
1. Power switch must be ON.
2. Machine must be in idle mode (not in a cooking
mode).
3. Cavity temperature must be less than the
programmed setting P41. Factory default is set
at 250°F (recommended).
A. If the temperature is above this setting when
the clean button is pressed, the unit goes
into cool down mode until temp goes down
to programmed setting P41or below.
4. All spits and accessories are removed from
interior of cavity.
5. No soft metals (i.e. Aluminum foil) are inside the
machine.
User Presses CLEAN Button
1. Preheat mode: Oven goes into pre-heat cooking
mode with a temperature programmed set point
in P42. The machine remains in preheat mode for
the number of minutes programmed in P32.
2. Drain Grease: The grease pump comes ON for
the number of minutes programmed in P30.
3. Pre-rinse: Factory default is 1 pre-rinse.
However, multiple pre-rinses are programmable
in P37.
KA SERIES ELECTRIC ROTARY OVENS - ELECTRICAL OPERATION
Page 47 of 72 F25294 Rev. A (0412)