


312027000 26
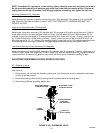
5. Adjusting Syrup Flow Regulator -- If water and syrup levels are uneven in the ratio cup, adjust by
turning the dispensing valve syrup flow regulator adjusting screw labeled SYRUP as follows.
A. For less syrup, turn the adjusting screw counterclockwise no more than 1/4 turn at a time.
B. For more syrup, turn the adjusting screw clockwise no more than 1/4 turn at a time.
6. Repeat water-to-syrup ratio test and adjust syrup flow regulator as many times as necessary until proper
ratio of dispensed drink is achieved.
7. Remove syrup diversion tube assembly from dispensing valve.
8. Install dispensing valve front cover.
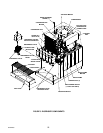
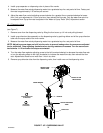
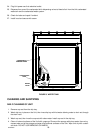
CLEANING DROP-IN REFRIGERATION ASSEMBLY CONDENSER COIL
(see Figure 5)
Excessive accumulation of dust, lint, and grease on the drop-in refrigeration assembly condenser coil will restrict
air flow through the coil and cause a loss of cooling. Perform the following procedure to clean the condenser
coil.
1. Unplug Unit power cord from electrical outlet.
2. Remove hood by loosening screw on top of the hood, then lift the hood straight up off the Unit.
3. Vacuum or use a soft brush to clean the condenser coil. If available, use compressed air to blow dust and
debris out of the condenser coil.
4. Clean dust and dirt from around top of the refrigeration assembly.
5. Install hood on the Unit and secure with one screw.
6. Plug Unit power cord into electrical outlet.
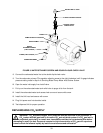
CHECKING ICE WATER BATH
(see Figure 5)
A “gurgle” heard from the Unit indicates water level in the water tank is low and more water should be added to
the tank for maximum cooling. Before adding more water, ice water bath and ice bank should be checked for
cleanliness and the water tank coils checked for excessive mineral deposit build-up.
1. Unplug Unit power cord from electrical outlet.
2. Remove Unit hood by loosening one screw on top of the hood, then lift the hood straight up off the Unit.
3. Remove plug from the drop-in refrigeration assembly platform water fill hole.
4. Using a flashlight, inspect the ice water bath and the ice bank for cleanliness. The ice water bath should be
clear and the ice bank should be free of foreign particles.
5. If cleaning of the water tank is necessary, refer to CLEANING WATER TANK in this section.
6. Fill the water tank with clean water until water runs out of the overflow groove on top front of the tank into
the drip tray. USE LOW-MINERAL-CONTENT WATER WHERE A LOCAL WATER PROBLEM EXISTS
When the water tank is full, the water level in the clear plastic water level tube should be approximately one
inch from end of the tube.
7. Install plug in the water fill hole.
8. Install the Unit hood and secure with screw.
9. Plug Unit power cord into electrical outlet.