


312027000
27
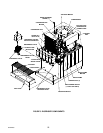
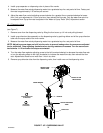
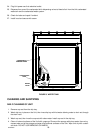
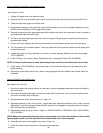
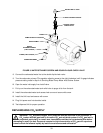
CLEANING WATER TANK
(see Figure 5 and 8)
1. Unplug Unit power cord from electrical outlet.
2. Shut off plain water supply to the Unit.
3. Note pressure setting on the primary CO
2
regulator for the carbonator, then turn the regulator adjusting
screw to the left (counterclockwise) until gage reads 0-psig.
4. Remove the Unit hood by loosening screw on top of the hood, then lift the hood straight up off the Unit.
5. Disconnect the drop-in refrigeration assembly power cord from the Unit power cord.
6. Disconnect the dispensing valves power cord from the drop-in refrigeration assembly mating power cord.
7. Disconnect the carbonated water tank sensor leads power cord from the drop-in refrigeration assembly
mating power cord.
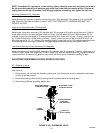
8. Remove screw securing the carbonated water tank access hole cover, then remove the cover for access to
the carbonated water tank relief valve.
9. Pull up on the carbonated water tank relief valve to release CO
2
gas pressure from the tank and the car-
bonated water system.
10. Disconnect the plain water inlet and the carbonated water outlet lines from the carbonator water pump.
11. Remove four hex nuts securing the drop-in refrigeration assembly in the Unit lower housing.
12. Very carefully, lift the drop-in refrigeration assembly up and out of the Unit lower housing.
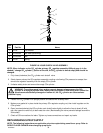
CAUTION: Never use an ice pick or other instrument to remove ice from the drop-in
refrigeration assembly evaporator coils. Such practice can result in a punctured
refrigeration circuit.
13. Allow ice bank to melt. Hot water may be used to speed melting.
14. Use a fiber brush and carefully clean mineral deposit build-up from the agitator motor shaft and the ice
bank sensing bulb.
15. Route the water tank drain hose to a drain. Remove plug from end of the drain hose and allow the water
tank to drain.
16. Wash inside of the water tank and the drop-in refrigeration assembly evaporator coils, then rinse with clean
water.
17. Install plug in end of the water tank drain hose.
18. Install the drop-in refrigeration assembly in the Unit by reversing the removal procedure.
19. Remove plug from the drop-in refrigeration assembly platform water fill hole.
20. Fill the water tank with clean water until water runs out of the overflow groove on top front of the tank into
the drip tray. USE LOW-MINERAL-CONTENT WATER WHERE A LOCAL WATER PROBLEM EXISTS
When the water tank is full, the water level in the clear plastic water level tube should be approximately one
inch from end of the tube.
21. Install plug in the drop-in refrigeration assembly platform water fill hole.
22. Turn the primary CO
2
regulator adjusting screw to the right (clockwise) until the gage indicates pressure
setting noted in step 3 preceding.
23. Restore plain water supply to the Unit. Check for CO
2
and water leaks and repair if evident.