


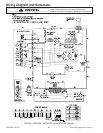
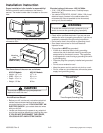


Installation Instruction
16021668 Rev. 0 A–8 ©2002 Maytag Appliances Company
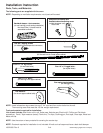
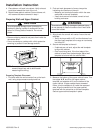
4. Place blower unit back into cabinet. Verify exhaust
ports face towards the front of the unit.
5. Attach blower plate to cabinet. Secure blower unit
with screws that were removed in step 1.
Preparing Wall and Upper Cabinet
CAUTION
!
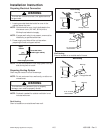
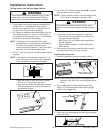
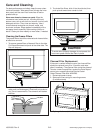
To avoid property damage cover countertop or
cooktop by placing a piece of cardboard from the
carton or a heavy piece of material. Do not use
plastic.
• Remove shipping material and parts from inside the
microwave oven.
• Cover countertop or cooktop with a thick protective
covering, to protect it from damage and dirt.
A thick, protective
covering
NOTE: For easy access to wall and upper cabinet,
remove range from wall to allow easier
measuring and drilling.
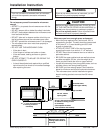
Preparing Template Placement
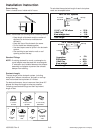
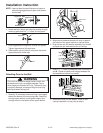
1. Find and mark the vertical center line on the back
wall, using a tape measure and plumb line.
2. Find and mark placement of one or two points
indicating stud location on the wall.
• Measure and mark stud location within the area
marked H on the wall template.
• If wall studs cannot be located, consult a local
building contractor.
WARNING
!
To avoid risk of property damage or personal injury,
do not attempt to install microwave oven if wall studs
cannot be located.
3. Align plumb line on wall with center line on the wall
template.
• Verify minimum width is 30" and the distance from
the top of wall template to the range or countertop
is at least 30".
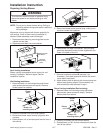
4. Secure wall template to the wall.
• If cabinets are not level, adjust the wall template
to align with cabinet.
• Oven must hang level. If the front edge of the
cabinet is lower than the back edge, adjust wall
template to be level with the cabinet front.
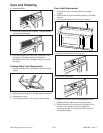
Upper cabinet template
Wall template
5. Measure the bottom of the upper cabinet frame. Trim
the edges A, B, and C on the upper cabinet
template, so template will fit on the bottom of the
upper cabinet. If upper cabinet has a recessed
frame, trim the template to fit inside the recessed
area. Align the centerline of the upper cabinet
template with the centerline on the wall template.
Secure upper cabinet template in place.