


Installation Instruction
16021668 Rev. 0 A–10 ©2002 Maytag Appliances Company
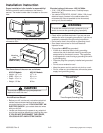
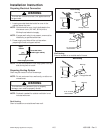
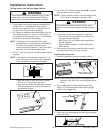
NOTE: Leave at least the wall thickness of space to
allow spring toggle head to open once placed
into the wall.
Wall
Mounting plate
T
oggle bolt
Spring
toggle head
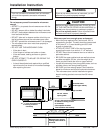
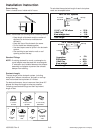
4. Locate wall stud holes and insert lag screws through
mounting plate and into
3
/16" holes, do not tighten .
L
ag screw
Mounting pate
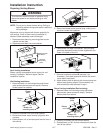
5. Insert toggle bolts through wall surface and tighten.
Tighten lag screws at this point also.
6. Slide washer onto the lock pin and place inside the
upper cabinet for further use.
L
ock pin
Wash
er
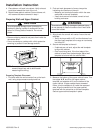
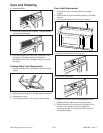
Attaching Oven to the Wall
WARNING
!
This unit is an excessive weight hazard, which can
cause personal injury or property damage. Two or
more people are required to lift unit. To prevent injury
or property damage, use proper lifting and carrying
techniques when moving unit.
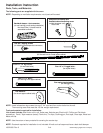
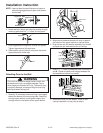
1. Carefully lift microwave oven and hang it on support
tabs at the bottom of the mounting plate. Reaching
through upper cabinet, thread power supply cord
through cutout in the bottom of the upper cabinet.
Power cord
Power cor
d
hole
2. Rotate the microwave upward until oven is against
the bottom of the upper cabinet or cabinet frame.
3. Drop the lock pin and washer assembly into hole N,
and push the pin downward as far as it will go.
Washer
Lock pin
4. Insert 3" X
1
/4" bolts and washers down into holes J
and K. Tighten the bolts until the gap between the
microwave and cabinet has closed.
5. Remove the lock pin and washer. If wall or roof
venting installation is used, skip to step 8.