


5 – Recording—Synchronized recording
TASCAM CD-RW402 Owner’s Manual 33
When the fade-out has finished, the display shows
Disc Full!! for a few seconds, and the unit then goes
into stop mode (the display shows
PMA Writing).
If the disc is a CD-RW, the final track can be erased,
if required (see “Erasing tracks” on page 41) and the
disc then finalized. If the disc is a CD-R, it must be
finalized prior to use (see “Finalizing” on page 40).
These following sections cover more advanced
recording techniques, such as synchronized record-
ing to allow automatic starting and stopping of
recording, automated track divisions, fading record-
ings in and out, copy protection, etc.
Synchronized recording
Synchronized recording means that recording will
begin automatically when a signal is received, and
will stop when the signal ends.
To enable or disable synchronized recording:
1 A recordable disc must be loaded.
2 With the unit in record ready or record
mode, press the
SYNC REC key.
The display shows
SYNC ON briefly, and then
changes to the track and time display. When
synchronized recording is enabled, the
SYNC
indicator lights in the display.
The
SYNC REC key is also used to turn off
synchronized recording (the display briefly
shows
SYNC OFF and then returns to the track
and time display).
Setting the trigger levels
The signal level which may be used with synchro-
nized recording operations, here called the “trigger
level” or “threshold”, is set as described below.
The CD-RW402 provides two separate trigger levels:
one for analog inputs and one for digital.
1 Press the
MENU key (2) and turn the MULTI
DIAL
to display REC MENU 1 ?.
2 Press the
MULTI DIAL.
3 Turn the
MULTI DIAL until the display shows
either
S_LEVEL(A) ? (analog) or S_LEVEL(D) ?
(digital), as required.
4 Press the
MULTI DIAL.
5 Turn the
MULTI DIAL to change the SLVL A or
SLVL Dvalue between -24, -30, -36, -42, -48, -54,
-60, -66, and -72 dB.
On the digital menu item only, there is an
additional setting:
SLVL D>MIN_L, which means
that any signal at all (even the quietest possi-
ble signal that can be recorded) acts as a
trigger.
6 Press the
MULTI DIAL to leave the menu.
Low numerical values of this setting (towards –24)
mean that it takes a louder signal to trigger the start
of the synchronized recording. A high numerical
value (towards –72) means that a relatively quiet sig-
nal will trigger the start of recording.
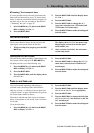
The conditions under which an input signal is used as
the trigger to start recording are:
• when recording digitally, a digital start signal is
detected
or
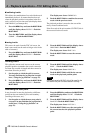
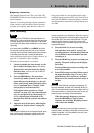
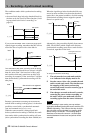
• the sound level rises above the threshold (see
below) after having been below the threshold for
one second or more. Note that the diagram below
represents a special case (the source is stopped or
paused) of the more general condition, as explained
later:
To start synchronized recording when the source is
stopped or in pause mode:
1 The unit must be in record ready mode, and
the
SYNC
indicator in the display must be lit,
as explained above.
2 Start playing the source. The pause indicator
disappears from the display, and the unit
starts recording.
Start of recording
noise
level
level
S_LVL
time