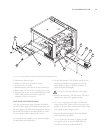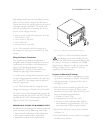
4. Using acetone, clean the oven floor where the
new wave guide cover will sit.
5. Apply a
1/8” diameter bead of high temperature
RTV (included with Item 29) along the outside
edge of the wave guide cover flanges.
NOTE: It is important to use the correct high
temperature
RTV as supplied by TurboChef.
6. Place the new wave guide cover in place. Secure
with the fourteen
(14) screws provided with Item
29
.
7. Wait 15 minutes for RTV to cure.
8. Warm oven to set temperature and re-check the
tightness of screws. Tighten if necessary.
WARNING: Inside of oven and IR element
are HOT! Use extreme caution during step 8.
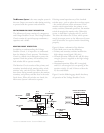
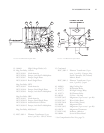
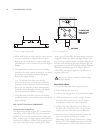
WAVE GUIDE/WAVE GUIDE COVER PARTS
Figure 22
29. NGC-3036 Kit, Wave Guide Cover (Includes
Item 31 and sealant)
30. 101666 Screws, #8-32 x 1/2, Cap
31. 101701 Screws, #8, SST
32. NGC-1047
Support, Frame
33. 102809
Screws, #8-32 x 3/8” CSK (100
º
)
34.
NGC-3017 Assy, Wave Guide, Rear
35. NGC-3015 Magnetron, Rear
36. NGC-3015
Magnetron, Front
37. NGC-3016 Assy, Wave Guide, Front
WAVE GUIDE REPLACEMENT
1. Remove the wave guide cover. See WAVE GUIDE
COVER REPLACEMENT
on page 29.
2. Remove the right side panel and frame support
(Item 32).
3. If replacing the front wave guide, use the NGC-
3016 kit. If replacing the rear wave guide, use
the NGC-3017 kit.
4. Remove the two
(2) right and left-most screws
(Item 30) that secure the wave guide to the oven
floor.
5. The wave guide should now be loose enough to
easily slide out from the right side of the oven.
NOTE: Be careful to not damage the insulation
when removing the wave guide.
6. Install the new wave guide using the mounting
screws provided with the kit (Item 34 if rear
wave guide, Item 37 if front).
CAUTION: Do not pinch insulation between
the wave guide and oven bottom.
7. Reinstall the wave guide cover.
8. Reinstall the side panel and apply power to the
oven.
HIGH VOLTAGE AND FILAMENT TRANSFORMER
REPLACEMENT
Wiring the High-Voltage Transformers
The proper reinstallation of the high-voltage and fil-
ament transformers is critical. Upon removing a
high-voltage transformer, make sure to note where
each wire was installed. Refer to the oven schemat-
ics (pages 55-63) detailing the proper wiring.
Specifically, T1 and T2 are located in the top-right
corner of the schematics.
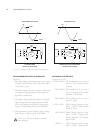
As shown in the schematics, transformers are
installed mirror opposite and wired
180
º
out-of-
phase. It is essential for longevity that the high-volt-
age transformers remain 180
º
out-of-phase. This can
be checked by placing a volt meter across terminals
T1-1
and T2-1.
With the Microwave System energized, the volt meter
will read
the incoming voltage (different readings for
different countries).
If the meter reads 0 VAC, the
THE MICROWAVE SYSTEM
30


