


EZ Pack Installation Instructions
(See Installation Guide taped to top of each unit.)
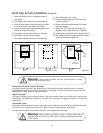
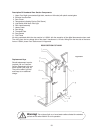
Installing the Refrigeration System
A qualified technician should install the refrigeration. Contact the dealer from who you purchased your Walk-In for
a qualified technician.
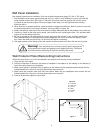
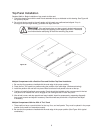
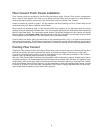
Carefully raise refrigeration system to top of walk-in. Insert projecting sleeve of evaporator box in to cut out of panel.
Install louvered grill on interior side of top panel. Grill should be installed with fan motors.
NOTE: On smaller systems unit can be installed on top panel before panel is installed on walk-in.
Warning! Never run system on an extended drop cord.
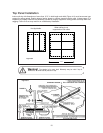
Allow sufficient airflow around the condenser. A minimum of 2-foot clearance is required for proper operation. If
more than one unit is located in the same area, do not exhaust hot air into other units. Indoor EZ Pack systems do
not require drains.
Airflow should always be directed towards door section.
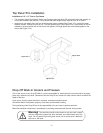
Setting Controls:
On walk-in coolers, the thermostat is factory set at
+
35 degrees. Walk-in freezers are set at minus 10 degrees. Step-
in freezers are set at 0 degrees. Adjustments can be made at control on thermostat located in evaporator box. On
walk-in freezers a defrost timer will have to be set to time of day. Defrost timer is located within condenser hous-
ing. Refer to Heatcraft Installation Guide for “Pro” Series.
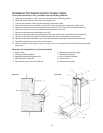
For Electrical Table, Refer to page 5, Heatcraft Installation Guide.
Final Checks Before Operation
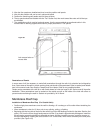
1. If the door has a threshold plate, secure it to the floor with the screws that are provided. These screws are
supplied by W. A. Brown and are taped to the door handle.
2. Check the door for alignment and proper operation. Check tightness of the door when it is shut. The use of
magnetic gaskets eliminates the need for the positive style door latch to be snug. A little play is acceptable.
3. Check the door for proper seal. If the door does not close and seal properly, check that the door section is plumb
with a spirit level and adjust as necessary.
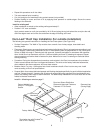
4. When a floor spline is used, secure the door angles to the building floor. We recommend you use expansion
bolts or a ram set type gun. Door must be plumb.
5. On door sections that do not have a threshold, it will be necessary to fasten spline covers at the bottom of the
door. These covers are fastened to a wood shipping bar used to space the opening at the bottom of the door
section.
6. Adjust the drag gasket on the bottom of the door. It should drag lightly on the threshold plate or floor to allow
for pressure relief.
7. Secure thermometer bulb if it is not a model secured at the factory.
8. Insert the metal plug buttons into the lock wrench holes in all panels.
9. Check that all penetrations have been sealed. These penetrations must be sealed on the outside as well as the
inside of the hole with silicon to prevent moisture entering the walk-in. (Sealant not provided by W. A. Brown.)
Warning! The electricity should not be turned on any door with a heater
until the refrigeration system has been activated, as a failed heater wire may
result.
12