


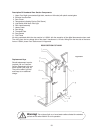
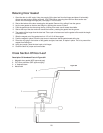


Replacing Flush Dial Thermometer
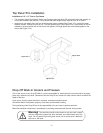
Dial Thermometer: Complete Field Replacement - Flush Mount in Figure #22
Locate thermometer to be replaced. From inside of box, cut wire tie holding bulb. Remove screws from flange
face with screw driver. Work flange free from section. A putty knife works well for this purpose. Applying uniform
pressure, pull bulb through section. Clean residual silicone from section.
Retrieve new thermometer, and unwrap. Using old thermometer as reference, re-wrap new thermometer
tubing in similar manner as old thermometer. Apply a small amount of silicone (not provided) to section around
cutout, and insert thermometer bulb first. Visually center thermometer face and insert screws (holes should align).
Place bulb on cradle and new wire tie wrap, and secure. Trim excess tie and apply silicone to hole in section. After
five to ten minutes check thermometer set point to known standard. If adjustment is needed follow instructions to
reset pointer.
21
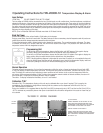
Figure #22
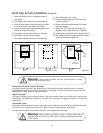
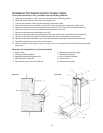
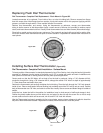
Installing Surface Dial Thermometer (Figure #23)
Dial Thermometer: Complete Field Installation - Surface Mount
To locate position of thermometer, for standard placement in leg of Door Section, look at leg that has the light switch
mounted in it. Measure from the center of the switch up 15 1/2" on center with switch and mark. Installation onto
other panels must be clear of locking devices and any other special applications.
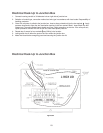
Center punch so that the Drill Motor will not lead off as the hole is produced. Using a 7/16" diameter drill bit,
produce a through hole. Using a 7/8" diameter drill bit, enlarge the outside 7/16" hole to a depth of approximately
1". Clean loose foam and debris from area.
Retrieve the thermometer and carefully straighten the bulb tubing. Place the bulb through the 7/16" hole towards
inside of box. Place a small bead of silicone caulking (not provided) around the 7/8" hole (to act as a seal). Position
body of thermometer over 7/8" hole, and rotate to center face visually. Secure screws and fasten flange to outside of
section.
Inside the box, locate the bulb in the position for installation, keep in mind amount of traffic and storage in box).
Position the plastic cradle where you wish bulb to be, and secure to the skin with the screw. Run a wire tie wrap
around cradle so that the bulb can be secured, trim tie and fill 7/16" hole with silicone.
After the Thermometer has been in operation for five to ten minutes, secure a known reference for which to check the
set point of the thermometer installed. If adjustment is needed, follow instructions to reset the pointer.
Figure #23