


Wall Panel Installation
See separate instructions for installation if box has multiple compartments (page 6-7) with a “Tee” panel.
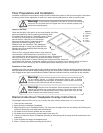
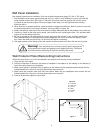
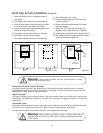
1. Start installation at the corner panel nearest the door or, if cooler is to be installed in a corner, start with the
corner located on the inside. (See Figure 7) Place the first corner panel into position. Be sure the ‘arrow’
is pointed up and the male tongue of the panel (edge w/cam locks) is on the right side when standing
inside the walk-in.
2. When locks are in standard positions, rotate clockwise to engage the locking pin. Refer to prints for locks that
are special applications: lock counter-clockwise, lock from exterior of panel, etc.
3. Install a wall panel on each side of the corner panel for stability. Make sure that all wall panels are even at the top.
4. Continue to install all wall and corner panels. Next install the wall containing the door. This provides better
support for correct setting of the door.
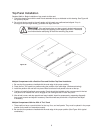
5. Be sure to engage all cam locking devices in each wall panel. After all wall, corner, and door panels have
been installed, check for squareness by measuring diagonally from corner to corner and adjust if neces-
sary. Check that walls are plumb with a 4' spirit level and adjust if necessary.
6. The angle brackets on the interior of the door section must be secured to the floor after the door is plumb.
Warning! If the wall panels have not been properly leveled and squared,
the top panels will not align and gapping or stair stepping will occur. This should
be corrected before attempting to install the remaining top panels.
Wall Protector Plate (Wainscotting) Instructions
All Wall Protector Plate is cut to size and labeled in accordance to the drawing for easy installation.
1. Clean and dry wall surface
2. Follow the sequence of labels on the sheets of treadplate in accordance to the labeling on the drawing to
layout the proper placement of treadplate.
3. Attach corner pieces, if applicable first, by applying to wall. Make sure the treadplate makes contact with the
finished outside floor. Secure to wall using sheet metal screw every 24".
4. Attach each wall protector plate flush with one another. Make sure the treadplates make contact with the
finished outside floor. Secure to wall using sheet metal screw every 24".
5. Caulk at all perimeter edges for proper finish.
5
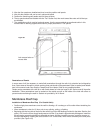
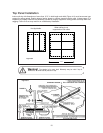
Figure #6
U = Urethane
S = Side wall
C = Corner
M = Male
F = Female
D = Door
Start Here
Existing
Building
2"
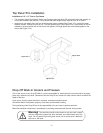
Figure 7
Level
Plumb all walls