


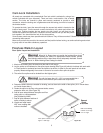


Floor Preparation and Installation
Installation instructions are provided for walk-ins with insulated floor panels or walk-ins set on spline. Instructions
are also provided for the application of walk-ins in areas requiring adherence to wind or seismic loads.
Warning! A level walk-in is essential. If the floor is not level, the vertical
panels will not be plumb and the hinged door will not operate properly and
panels will not seal properly.
Layout of the Floor
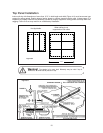
Check the floor plan of the walk-in for the exact location of the floor
panels as indicated on the floor panel layout drawing which
is furnished with each walk-in. The building area on which
the walk-in is to be erected should be chalked to the
base of the box. If the walk-in is to be erected
next to an existing wall a 2" clearance should
be allowed for surface irregularity. Set-up
‘Builders Level’ per instructions. Take readings at
selected intervals on a story pole to determine the
highest point of floor assembly. Mark the high point
and shim to this level.
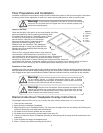
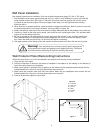
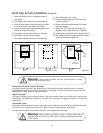
Shims of 24 to 12 gauge sheet metal or cedar wood are
recommended. Shims should be cut a minimum 4" x 4". Shims
must extend under the whole section, not just the edges. Shims should
be at each end, at all wall seams and at each floor seam. All shims
should be no further than 12" apart. Shimming will reduce load limits. Shims are
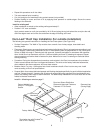
not supplied with shipment. An alternate method of leveling is to level the unit by filling in with a level bed of
sand. Cover the sand with a poly film or asphalt paper before installing the floor. See Figure #1.
Installation of floor panels
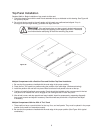
Installation of the floor may begin when the floor leveling is complete. Refer to the floor panel layout drawing which has
been furnished with the walk-in. Begin installing the floor with an end panel. Continue until all panels are set and are
level. Engage all cam locks as the panels are installed. Recheck levelness of the floor panels after all are complete.
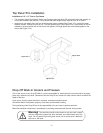
Warning! Position the floor panels per the drawing to ensure that the door
will be properly placed. In multiple compartment walk-ins with a partition
section, it is imperative that the panels be located in proper position and turned
correctly so that walls and tops will lock securely.
Warning! Attention Floor Contractors: Some chemicals and vapors in field
applied floor materials can cause metal corrosion. Use extreme care to keep
these materials off of metal surfaces and to keep doors open fully and the
cooler ventilated until inside flooring is cured.
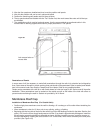
Diamond Aluminum Treadplate Overlay Instructions
All treadplate material will be cut to size, to match the entire interior surface less 1/2" on all four sides.
1. Clean and dry subsurface
2. Apply silicone to underside of treadplate
3. Begin laying first row of Treadplate Overlay 1/2" away from the edge of the floor according to the Drawing and
secure the subsurface with sheet metal screw/anchor.
4. All sheets must be flush as possible with one another.
5. All sheets can be secured using a sheet metal screw every 24".
6. Continue to follow the layout of treadplate according to the drawing until all sheets are flush and secure to the
subsurface.
7. Caulk all seams and edges of treadplate layout.
8. Allow 1-3 hours to dry before resuming use of walk-in.
Shim
Level
Level
2
Figure #1
U = Urethane
B = Bottom
O = Out
S = Side
M = Male
F = Female