


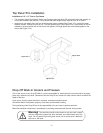
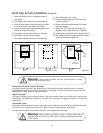

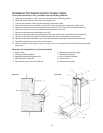

Roof Cap & Curb Installation (Figure #14)
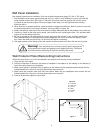
Wiring the Door Heater, Lights & Windows
All freezers and some coolers are shipped with a 120V peripheral heater around the door to eliminate
condensate and keep the door frame and jamb from “sweating”. Likewise most freezer windows are also
designed with a 120V heater for the same reason.
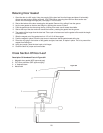
Vapor Proof Light
This light is internally wired to the light switch. Only source power needs to be wired into the junction box
powering the light. Maximum bulb size is 100 watts. Do not operate with globe until walk-in is at operating
temperature.
Fluorescent Lights
These lights are field installed and will require both source power and internal wiring by a qualified electrician.
The above will be wired to door switch via “J” Box on interior of door section in most cases.
All installation should be in accordance with NSF and prevailing electrical code.
Warning! When installing your Walk-in cooler or freezer, always use a
qualified electrician for all your wiring needs. Refer to wiring diagram included
in this manual.
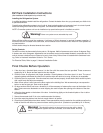
Warning! Never penetrate rubber roof cap, (with exception of rubber
grommet unit mounting screws.)
13
.
.
.
.
.
.
.
.
.
.
.
.
.
.
.
.
.
.
.
.
.
.
.
.
.
.
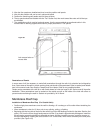
Cut-Out
Opening
2nd Piece
Wood Curb
Rubber Roof Cap
Base
Handles
Refrig-
eration
Unit
Copper Drain
Line Outlet
3/4" PVC
Drain Line
with Armor Flex
Drain
Line
Clamps
1. Make sure Walk-in top is completely clean of
any debris.
2. Run bead of Silicone around cut-out opening.
3. Install 2 piece Wood Curb (provided) onto Walk-
in top with counter sink screws (provided).
4. Follow procedures for installing Membrane Roof
Cap over Wood curb, page 7.
5. Cut rubber roof cap over opening in X shape.
6. Roll rubber roof cap inside opening.
7. Run bead of Silicone around cut-out opening.
8. Set refrigeration unit in place.
9. Install protruding sleeve of unit into cut out
opening of walk-in.
10. Screw unit base handles down with rubber
grommet screws.
11. Install 3/4" PVC drain line with armor flex
insulation over copper drain line. (Optional)
12. Install clamps over drain line on side of walk-in.
13. Run bead of silicone around unit base, rubber
grommet screws and drain line.
Figure #14