


35
x
The heating elements and the condenser and convection fan will stop. The buzzer will
sound for 3 seconds.
x
Steam will stop being produced and the compartment will return to the Standby Heating
Mode.
(19)Open the cooking compartment door to vent the steam and allow the compartment to cool
slightly. After 2 or 3 minutes, close the door and continue testing.
(20)With the TIMED/MANUAL switch set to TIMED, set the timer for 10 minutes.
(21)As soon as the dial is set, the steam generating cycle starts. This is the same sequence
observed in steps 5 through 7, except:
x
The timer controls the cycle.
x
The elapsed time to produce steam is shorter because the water in the steam generator
and the cooking compartment were preheated during step 15.
x
The timer automatically returns the unit to the standby heating temperature (as described in
step 9) after counting down to zero.
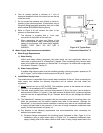
(22)After the timed operation has been started, observe the following steam generating functions.
a) The heating elements and convection fan come on immediately. Depending on
temperature in the compartment the “SureCook” indicator will also come on. The
“SureCook” indicator remains ON until the compartment reaches the minimum
cooking/standby heat temperature, at which time the timer begins counting down to zero,
and the “SureCook” indicator light turns OFF and the condenser will come ON. Shortly a
small stream of water flows from the drainpipe.
b) As the unit generates steam, the water level fluctuates and a clicking sound is heard as the
solenoid opens and closes the fill valve. The level in the reservoir rises and falls between
the upper and lower fill limit as the fill valve operates.
c) Check for steam leaks around the door.
When the timer counts down to zero, the heating elements, the condenser flow and
convection blower turn OFF, and the buzzer sounds for 3 seconds.
a) After about 30 seconds steam stops being produced.
(23)Turn the steamer OFF by turning the ON/OFF lever/switch counterclockwise to the OFF
position. The green Power ON indicator light turns OFF immediately, and the automatic drain
rinse cycle starts. DO NOT turn OFF the power at the main power switch until the drain rinse is
complete. The cycle takes about 3 minutes.
(24)When the drain rinse is complete, turn the steamer OFF at the main power switch.
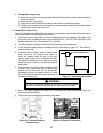
(25)Install the side panels and secure them in place with the original fasteners. After completing the
Startup and drain rinse Inspection procedure, and the Operating Test procedure; the steamer is
ready for service. Refer to Chapters 1 and for complete operating and safety instructions.