


Component Operation and Maintenance, Checks and Adjustments
57
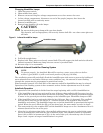
Compressor Replacement Procedure
Replacement compressors are available from your Liebert supplier. They will be shipped in a reusable
crate to the job site as required by the service contractor.
Upon shipping a replacement compressor, the service contractor will be billed in full for the compres-
sor until the replacement has been returned to the factory.
The compressor should be returned in the same container used for shipping to the job. The possible
damage causes or conditions that were found should be recorded by marking the compressor return tag.
1. Disconnect power.
2. Attach suction and discharge gauges to access fittings.
3. Recover refrigerant using standard recovery procedures and equipment. Use a filter-drier when
charging the system with recovered refrigerant.
4. Front seat service valves to isolate the compressor. Reclaim charge from compressor.
5. Remove service valves, pressure switch capillaries, and disconnect all electrical connections.
6. Remove failed compressor.
7. Follow manufacturer’s instructions for clean out kits.
8. Install replacement compressor and make all connections.
9. Pressurize and leak test the system at approximately 150 PSIG (1034 kPa) pressure.
10. Evacuate the system twice to 1500 microns, and the third time to 500 microns. Break the vacuum
each time with clean, dry refrigerant to 2 PSIG (13.8 kPa).
11. Charge the system with refrigerant (R-22) based on requirements of the evaporator, condensing
unit and lines. Refer to the installation manual or the unit nameplate.
12. Apply power and operate the system. Check for proper operation. Refer to Table 16 for design
pressures.
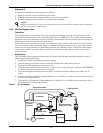
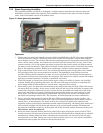
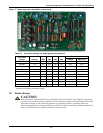
7.5 Humidifier
7.5.1 Infrared Humidifier
During normal humidifier operation, deposits of mineral solids will collect in the humidifier pan. This
should be cleaned out periodically to ensure efficient operation. Each water supply has different char-
acteristics, so time interval between cleanings must be determined locally. A monthly check (and
cleaning if necessary) is recommended.
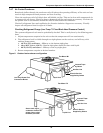
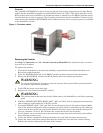
The humidifier pan is easily removed by draining the pan (remove the standpipe), disconnect the
drain coupling, and removing the retaining screws on each end of the pan.
Scale on the side and bottom can be loosened with a stiff brush. Flush with water and replace pan in
humidifier.
An autoflush system can greatly increase the time between cleanings, but does not eliminate the need
for periodic checks and maintenance.
!
WARNING
Do not loosen any refrigeration or electrical connections before relieving pressure.
NOTE
Release of refrigerant to the atmosphere is harmful to the environment and is unlawful.
Refrigerant must be recycled or discarded in accordance with federal, state, and local
regulations.
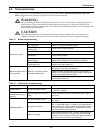
!
CAUTION
Before removing pan, be sure power to unit is disconnected and water in humidifier pan is no
hotter than lukewarm.