


Component Operation and Maintenance, Checks and Adjustments
58
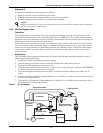
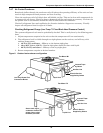
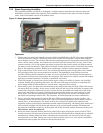
Changing Humidifier Lamps
1. Open disconnect switch.
2. Open middle front panel.
3. Remove screws securing line voltage compartment cover, then remove the cover.
4. In line voltage compartment, disconnect one end of the purple jumpers, then locate the
burned-out bulb with a continuity meter.
5. Remove humidifier pan.
6. Remove lamp brackets (3) under lamps.
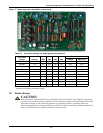
Figure 9 Infrared humidifier lamps
7. Loosen two screws securing bulb wires to junction block.
8. Pull bulb straight down.
9. Replace bulb. Wrap wires once loosely around bulb. This will support the bulb and also allow for
thermal expansion. Make sure lamp wires are secure in junction block.
10. Reverse steps 1-6 to reassemble.
Autoflush Infrared Humidifier Cleaning System
The autoflush system will periodically flush the humidifier pan with water to prevent the buildup of
water minerals due to saturation. Because water conditions vary, the amount of water flushing
through the system may be programmed to match local needs.
Water amounts between 110% and 500% of the amount needed for humidification may be selected.
Operation of the flushing system is then automatic and no further adjustments need to be made.
Autoflush Operation
The operation of the autoflush is divided into four steps beginning with a call for humidification.
1. If the humidifier has not been activated for over 30 hours, the autoflush will flow water into the
pan for about 30 or 60 seconds (based on the size of the pan). This will provide a minimum amount
of water in the pan and prevent heat damage to the humidifier pan. Humidifier lamps are OFF.
2. If the humidifier has been activated within the last 30 hours, Step 1 is bypassed. The autoflush
will flow water into the pan for about 4 or 7 minutes (based on the lengths of time between
humidifier activations). The humidifier lamps are on and the humidifier is operational during this
period. When the pan is filled (the fill cycle has timed out), the water make-up valve is closed.
3. The water make-up valve remains OFF and the humidifier lamps are on for a maximum of 8 to 10
minutes (based on the size of the pan).
4. After the 8 to 10 minute time delay, the autoflush adds water to the pan to replenish the water
used in humidification and flush the pan of mineral solids. This amount of water is adjustable
from 110% to 500% in increments of 10%. At the end of this cycle, the make-up valve is closed.
Steps 3 and 4 repeat as long as humidification is required.
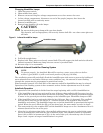
!
CAUTION
Do not touch the quartz lamps with your bare hands.
Oily deposits, such as fingerprints, will severely shorten bulb life—use clean cotton gloves at
all times.
NOTE
To operate properly, the Autoflush Humidifier requires a water source that can deliver
at least 1 gpm (0.063 l/s) with a minimum pressure of 20 psig (138 kPa).
Humidifier lamps