


CONVERSIONS
High Altitude
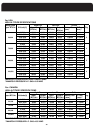
In the United States, the modifications for high altitude are
based on a 4 percent reduction of input capacity for every
the impact of altitude for selected elevations. Ratings
shown apply to the highest elevation in range.
Consult with local fuel suppliers or authorities to determine
local regulations or customs.
In Canada, the furnace may be converted for high altitude
(2000 - 4500 feet) by changing the burner orifices. Use Kit
No. 30552. The kit contains both natural gas and L.P. gas
Natural to L.P. Gas
This series furnace is manufactured as a natural gas (sea
level) appliance. It may be converted to L.P. gas with the use
L.P
. to Natural Gas
Although the furnace is manufactured initially as a natural
gas appliance, if after an L.P. Gas conversion it becomes
necessary to convert back to natural gas, and if the original
WARNING
NEVER PURGE A GAS LINE INTO THE COMBUSTION
CHAMBER.
NEVER USE A MATCH, TAPER, CIGARETTE LIGHTER,
FLAME OR ANY OTHER IGNITION SOURCE TO CHECK
FOR LEAKS IN A GAS LINE.
FAILURE TO ADHERE TO THIS WARNING CAN CAUSE A
FIRE OR EXPLOSION RESULTING IN PROPERTY DAMAGE,
PERSONAL INJURY, OR LOSS OF LIFE.
Gas piping that has not been pressure tested, from the
manual shutoff valve to the furnace gas valve for example,
should be leak tested using an electronic combustible gas
detector, a commercially prepared leak detector such as Gas
Leak Detector® or Search®, or other locally approved
method. A leak detector solution can be prepared by mixing
a
small quantity of dish detergent with water and daubing
i
t onto the gas piping and connections.
C
onversion Steps
To convert from sea level to high altitude, from natural gas
to L.P. gas, or from L.P. gas to natural gas, follow these
steps:
Turn off gas supply to the furnace if applicable.
1. Shut off electrical power to the furnace if applicable.
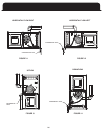
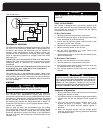
2. Remove the upper front door to expose the gas train and
b
urner assembly.
3. Unfasten the ground joint union between the gas valve
and gas supply piping if applicable.
4. Unfasten the burner manifold pipe from the burner
a
ssembly. It is held in place by 2 screws on either end of
the manifold pipe.
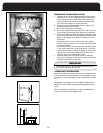
5. Remove the existing orifices with a 7/16 inch socket, box
or open-end wrench. Install the replacement orifices. The
orifice spuds are brass, and do not normally require pipe
dope. A light grease may be used to lubricate the
threads. The orifice spuds have tapered threads; do not
over-tighten them.
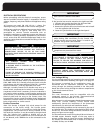
If completing a fuel conversion, remove the protective
screw cap from the gas valve regulator adjustment.
Remove the regulator adjustment screw by turning it
counterclockwise. Remove the existing regulator springs.
6. Install the new regulator springs.
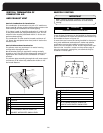
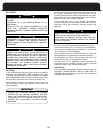
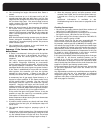
GAS VALVE
Outlet Pressure
Post Set Screw
Regulator
Vent
Inlet Pressure
Post Set Screw
On/Off Switch
Regulator
Adjustment
3 Pin Connector
Regulator
Adjustment
If converting the gas valve, the regulator spring is
tapered. The tapered end (small end) is inserted back
into the gas valve regulator adjustment cavity.
NOTE
7. Reinstall the adjustment screw. Give it 3 full clockwise
turns initially. Do not reinstall the protective screw cap yet.
8. Reinstall the burner manifold pipe assembly following
steps 4, 5, and 6 in reverse order.
29
of Kit No.194301570001(contact manufacturer for availability).
The kit contains the orifices needed for all models, the
regulator spring for the gas valve, and a label to affix adjacent
to the appliance rating plate to alert subsequent
service technicians of the conversion.
parts are unavailable, Kit No. 194301580001 may be
purchased. It is similar in nature and content to the L.P. Gas
conversion kit.
1000 feet above sea level. Table on page 30 illustrates
orifices; see Table on page 30.