


B-6
OPERATION
SQUARE WAVE TIG 255
Return to Section TOC Return to Section TOC Return to Section TOC Return to Section TOC
Return to Master TOC Return to Master TOC Return to Master TOC Return to Master TOC
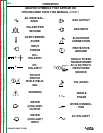
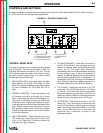
4. AC WAVE BALANCE: These keys are active in
the AC TIG mode only. They are used to set the
amount of cleaning and/or penetration produced
during an AC TIG weld. Auto Balance™
automatically sets the AC Wave Balance according
to the welding current. If manual adjustment is
desired, the Manual Balance key can be pressed,
and the balance adjusted from +5 (cleaning) to -10
(penetration) with the Cleaning and Penetration
keys. Read the Advanced Features section for a
complete explanation of the AC Wave Balance.
5. TIG PULSER: These keys are active in the TIG
mode only. The On/Off keys turn the TIG Pulser
on and off. The Pulses Per Second keys adjust
the pulsing frequency up and down, from 0.5 to 10
pulses per second. Read the Advanced Features
section for more information on the TIG Pulser.
6. AFTERFLOW: These keys are active in the TIG
mode only. They must adjust the afterflow time
from 5 to 50 seconds for shielding gas and cooling
water flow through solenoids located on the case
front. As the Afterflow time is adjusted, the
Afterflow time, in seconds, is shown in the
Momentary Display.
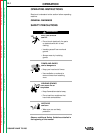
CONTROL PANEL KEYS
The keys are grouped into six areas, described below
and in Figure B.1. Some areas are active in both TIG
and Stick, while others are active in TIG only. The red
LED indicator lights are used to tell which functions
are active, and the display (Item 1) is used to check
the settings of the up/down keys.
1. WELD MODE KEYS: These keys select the Weld
Mode desired: TIG 2-Step, TIG 4-Step, or Stick.
Read the complete Operating Instructions section
for more information on TIG 2-Step and TIG 4-
Step.
2. CURRENT CONTROL: These keys select Local
or Remote and adjust the Amps Up or Amps
Down. These keys are used to set thewelding cur-
rent from 5 to 315 amps, as well as to select Local
or Remote control. Local control allows the current
to be adjusted only with the Amps Up/Amps Down
keys. Remote control allows the use of a hand or
foot operated remote control. Read the complete
Operating Instructions
section for more information
on Local and Remote.
3. HIGH FREQUENCY: These keys are active in the
TIG mode only. Select from Continuous, Start
Only, or Off. Read the TIG Welding Section for
information on High Frequency.
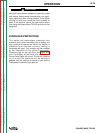
CONTROLS AND SETTINGS
All operator controls and adjustments are located on the case front of the Square Wave TIG 255. Refer to Figures
B.1, B.2.a and B.2.b and corresponding explanations.
FIGURE B.1 - CONTROL PANEL KEYS
2
LINCOLN
R
ELECTRIC
THE LINCOLN ELECTRIC COMPANY CLEVELAND, OHIO USA
ON
OFF
TIG PULSER
WELD MODE
HIGH FREQUENCY
AFTERFLOW
CURRENT CONTROL
LOCAL
REMOTE
STICK
TIG 2-STEP
TIG 4-STEP
HF
HF
CONTINUOUS
START ONLY
OFF
HF
2
SECONDS
PULSES PER SECOND
AMPS
A
f
CLEAN
PENETRATE
AC WAVE BALANCE
AUTO-
BALANCE
MANUAL
BALANCE
G2612
AC/DC OUTPUT CAPACITY: 255 AMPS 30 VOLTS 40% DUTY CYCLE
7
1
2
3
4
5
6
1. WELD MODE KEYS 5. TIG PULSER KEYS
2. CURRENT CONTROL KEYS 6. AFTERFLOW KEYS
3. HIGH FREQUENCY KEYS 7. DISPLAY
4. AC WAVE BALANCE KEYS