


SQUARE WAVE TIG 255
Return to Section TOC Return to Section TOC Return to Section TOC Return to Section TOC
Return to Master TOC Return to Master TOC Return to Master TOC Return to Master TOC
F-41
TROUBLESHOOTING & REPAIR
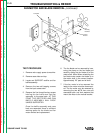
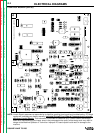
FAN MOTOR AND BLADE REMOVAL
(continued)
TEST PROCEDURE
1. Remove main supply power to machine.
2. Remove case sides and top.
3. Locate and SUPPORT rectifier and fan
baffle assembly.
4. Remove the two self-tapping screws
from the input access door.
5. Remove the five thread-forming screws
holding the fan baffle and rectifier
assembly to the case back. AT THIS
POINT THE RECTIFIER AND FAN
BAFFLE ASSEMBLY WILL DROP
UNLESS SUPPORTED.
Once the baffle assembly and case
back are separated there is sufficient
working space for fan blade and fan
motor removal and replacement.
6. The fan blade can be removed by loos-
ening the clamp on the fan blade and
carefully sliding the fan blade off of the
motor shaft. Note: When reinstalling the
fan blade make certain the blade is on
the motor shaft in the correct location.
Approximately .25” past end of shaft.
7. If the fan motor is to be removed the
leads to the motor must be disconnect-
ed. The fan motor may be removed by
removing the two #8-32 hex nuts and
associated plain and lock washers that
mount the motor to the vertical bracket.
Fan
Mounting
Hardware
Vertical
Bracket
Fan Baffle