


6
cleaning
Cleaning the Rotisserie
Before using your OSTER
®
Carousel Rotisserie for
the first time:
Wash the cooking basket, spit, drip pan, reflector
shield and door in hot, soapy water. Rinse and dry.
N
OTE
:
The following items are dishwasher safe:
door (top rack only), drip pan, cooking basket,
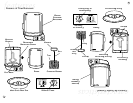
and reflector shield. To remove the door from the
rotisserie, turn the door counter-clockwise until it
has been rotated to the back of the unit. Then, lift it
straight up from the unit. When replacing the door
onto the rotisserie unit, be sure to locate the door
so that it will be on the back side of the unit when it is
installed. Locate the pin on the door into the hole that
is on the top of the rotisserie. Once the pin and hole
are engaged, the door can be rotated clockwise to the
front of the unit.
The reflector shield can be removed by grasping the
handle on either side and pulling in either direction
until it is pulled clear of the unit.
CAUTION: REFLECTOR SHIELD HAS A SHARP EDGE.
Always make sure rotisserie is unplugged and cool
before attempting to clean.
To clean, wipe manually with a damp, soft cloth.
Do not use any abrasive materials. Do not immerse
in water! Wash individual parts as instructed above.
Caring for Your Rotisserie
1. Keep your Rotisserie clean.
2. Do not use metal utensils.
3. Make sure that the unit is completely cool
and dry before storing.
6
limpiando
Limpiando el Asador
Antes de usar su Asador Carrusel OSTER
®
por primera vez:
Limpie la canasta de cocción, la varilla, el plato recolector,
el escudo reflector, y la puerta en agua caliente y jabonosa.
Enjuague y seque.
NOTA:
Los siguientes elementos son lavables en lavavajillas:
puerta (rejilla superior únicamente), plato recolector, canasta
de cocción, y escudo reflector. Para remover la puerta del
Asador, voltee la puerta en sentido contrario a las manecillas
del reloj hasta que haya girado a la parte posterior de la
unidad. Entonces, levante directamente hacia arriba de la
unidad. Cuando ponga de nuevo la puerta en su lugar,
asegúrese de colocar la puerta en la parte posterior de la
unidad cuando la instale. Inserte el perno de la puerta en
el hoyo que está localizado en la parte superior del asador.
Una vez que el perno o tornillo y el hoyo han sido
enganchados, la puerta puede girar en sentido de las
manecillas del reloj hacia el frente de la unidad.
El escudo reflector puede ser removido tomando el asa
en cualquier lado y jalando en cualquier dirección hasta
que se saque por completo fuera de la unidad.
CUIDADO: EL ESCUDO REFLECTOR TIENE UN BORDE FILOSO.
Siempre asegúrese que el asador esté desconectado y frío
antes de intentar limpiarlo.
Para limpiar, hágalo manualmente con un paño suave y
húmedo. No use ningún material abrasivo. ¡No sumerja
en agua! Lave las partes individuales como se ha indicado
anteriormente.
Cuidados para Su Asador
1. Mantenga su Asador limpio.
2. No use utensilios de metal.
3. Asegúrese de que la unidad esté completamente fría
y seca antes de almacenar.