22
4. Make small indentation on top of dry ingredients (not so deep it reaches the
wet layer) and add yeast/baking powder/baking soda.
Important: Indentation for yeast is important, especially when using the
delay bake timer. It keeps yeast away from the wet ingredients until the
kneading process begins. (Liquid ingredients will prematurely activate the
yeast.)
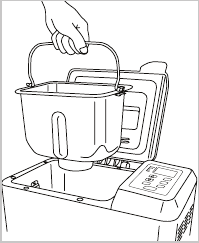
5. Insert the bread pan into the baking chamber. Press
down on rim of bread pan until it snaps securely into
place (D).
Note: If bread pan does not snap securely into place,
remove bread pan. Wearing oven mitts, place fingers
behind bread pan clips and gently pull away from oven
wall. Insert bread pan again.
6. Close the lid. Plug into standard electrical outlet.
Bread maker will beep and three zeros will flash in
display window.
7. Press MENU to choose desired Course. The operation light will illuminate.
Each time MENU is pressed, unit and display will move to next Course.
8. Press CRUST to choose crust color. Bread maker is preset for MEDIUM
Note: CRUST will not be activated for the following courses:
•Jam
•Dough
•PizzaDough
•BakeOnly
Note:WhenusingDough,PizzaDough,PastaDough,BatterBread™orJam
courses, steps 7 and 8 are not needed.
9. Press LOAF SIZE to select: 1, 1.5 LB, or 2.0 lb. Bread maker is preset to 2 lb
Note: Loaf size cannot be activated for the following courses:
•BatterBreads
•Jam
•PizzaDough
•PastaDough
Note: Although bread maker is capable of making 1.0 lb. loaves, we recommend
baking 1.5 and 2.0 lb recipes for more uniform loaves of bread. This is especially
true for breads that contain whole grains or other special ingredients such as
sunflower or sesame seeds.
10. Add ingredients such as dried fruits, nuts or herbs to the Fruit & Nut
Dispenser
Important: Do not exceed
2
/3 cup capacity.
Important: Do not pour liquids or spices into dispenser. Always make sure
fresh fruit or vegetables are not wet. Pat dry before putting them in the
dispenser.
D


