


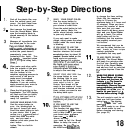

Step-by-Step Directions
1.
Peel off the plastic film
cover
from the control panel and
remove
the static label from
the front of the machine.
2
’
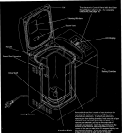
Next remove the bread pan
from the Bread Maker. Make
sure the kneading blade is
placed securely in the bottom
of the pan.
3.
Measure all ingredients into
the bread pan in the order
dia a small hole in the flour
so-that the yeast doesn’t
prematurely come into
contact with the
Iiquids.
This
is
es,pecia!ly
important when
yzeylusl”g
the delay bake
Wipe water and other spills
from the outside of the pan;
then insert the pan firmly
into the bottom of the
machine, appl
each corner
of
ying pressure to
the pan to
make sure it is snapped
tightly into the retaining
brackets. If you ate unsure,
apply pressure once more to
each corner of the pan.
5.
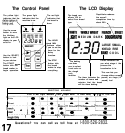
Close the lid and plug in the
breadmaker. The LCD display
will flash and then go blank,
indicating that your unit is
ready for operation.
6.
CHOOSE YOUR BREAD TYPE.
Use the arrow button to
move
the blinking light to
the type of bread you want.
Press the select button to lock
in your choice. Hint: If your
recipe is a
l-l/2
pound loaf of
bread that uses the white
cycle:
and you want a
medium crust color, press the
start button
button. This is a built-in
default.
7.
8.
9.
SELECl
YOUR CRUST COLOR.
Use the arrow button to
move
the blinking light to
your choice of crust color.
Press the select button to lock
in your choice. (Note: For
whole wheat breads, medium
is your only choice.)
If you only want to make
dough, simply press the select
button when the word dough
is
blinkinq.
IF YOU WANT TO USE THE
RAPID CYCLE. The rapid bake
function shortens the overall
completion
time by about 20
percent.
Breads baked on the
rapid cycle are generally
smaller because of a shorter
~%;$2gE$:t””
otherwise press the
arrow
key
to skip to the next step.
SELECT YOUR LOAF SIZE. Use
the arrow button to
move
the blinking light to your
choice of loaf size and then
press select to lock in
your
choice. Your bread Wil
I be
ready in the number of hours
and minutes indicated on the
timer, unless you want to use
the delay bake cycle.
IF YOU WANT TO USE THE
DELAY FUNCTION.
This function lets
the completion oY
ou delay
your bread
until a later time. If you want
your bread done
10
hours
from now
-
in time for
dinner, let’s say
-you need to tell the Bread
Maker to delay the onset of
operation. Do this b
using
the HOUR and MIN
I!
“ttonr
II.
12.
13.
to change the timer setting.
(Note that the maximum
delay is 13 hours; the
minimum delay is 3 hours and
45 minutes). When you have
entered the number of hours
from now that you want
your bread to be done, press
start and your Bread Maker
will go to work. The yellow
delay button will be on
indicating that the machine
has properly received your
instructions.
We recommend that you do
not use the delay function on
sweet breads, as these recipes
contain perishable
ingredients that may spoil.
TO ADD FRUITS OR NUTS
(MIX-INS). The Bread Maker
will beep five minutes after
the first rise. Carefully open
the lid of the Bread Maker
and add any fruit or nuts that
;I$
recipe requires. Close the
WHEN THE BREAD IS DONE.WHEN THE BREAD IS DONE.
The Bread Maker will beepThe Bread Maker will beep
five times and the timer willfive times and the timer will
indicate
0:OO.
The bread isindicate
0:OO.
The bread is
best taken out of the panbest taken out of the pan
immediately. Remove the panimmediately. Remove the pan
using potholders, and slideusing potholders, and slide
the bread of the pan.
It's
the bread out of the
.
best to let your breadbest to let your bre
cool
minutes before slicing. Enjoy!minutes before slicing. Enjoy!
The unit needs to cool for at
least one half hour before
using it a ain. The display
panel
WII
,Pread “Hot” until
the unit is ready to
use.
Allow
your bread maker to cool
before cleaning and storing.
(See
page 53)
18