5
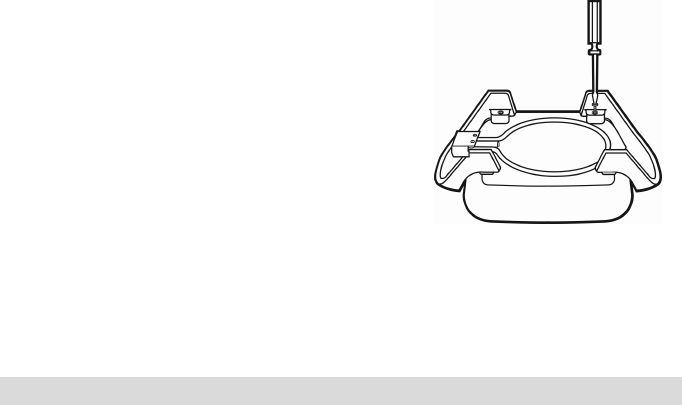
The provided handle/legs must be assembled onto skillet before use
(unassembled models only).
1. Place skillet upside down on tabletop or countertop.
2. Position first handle/leg on side of skillet with socket, lining up holes in legs with
mounting projections on skillet.
3. Using appropriate screwdriver, securely attach
handle/leg with two of the long screws
provided. Repeat steps 1 and 2 to assemble
second handle/leg on opposite side of skillet.
4. To assure proper installation of skillet
handle/legs, place assembled skillet right side
up on a flat surface and lift with handles.
Handles should feel tightly secured.
5. If the skillet rocks when placed on a flat
surface, remove screw on the leg, which is not
resting on the surface. Install one of the enclosed washers between the skillet
mounting projection and leg. Replace the screw following instructions 3 and 4
above. If the skillet is not level after the addition of the washer, add the second
leveling washer in the same manner to the opposite leg not resting on surface.
Note: Washers are included to aid in leveling, if necessary.
U
SING
Y
OUR
E
LECTRIC
S
KILLET
1. Place appliance on dry, level, heat-resistant surface, away from any edge.
NOTE: Do not block airflow under the skillet.
2. Attach heat control to skillet, making sure it is set at “OFF”. Plug cord into a 120
volt AC electric outlet only.
3. Preheat skillet, uncovered, for 2 to 4 minutes until desired temperature is
reached, unless recipe states not to preheat. Signal light on heat control will be
on while skillet is heating.
4. Refer to the Temperature Guide in this booklet for selecting the correct heat
setting. (If food is frozen, use heat setting as indicated, but allow longer cooking
time).
5. When the signal light on the heat control goes out indicating that the cooking
temperature has been reached, add the food. Heat may be increased or
decreased, depending upon personal preference and the type or amount of food
being prepared. The signal light will go on and off during cooking to indicate that
proper temperature is being maintained.
6. At the end of the cooking period, set the heat control at WARM for serving, or at
OFF if food will be removed immediately from skillet. After dial is set at OFF,
unplug cord from wall outlet.
• A small amount of odor may occur during operation due to the release of
manufacturing oils – this is normal.


