


35
Special Set-Up Procedure (Continued)
WARNING – It is recommended that no less than two people assist on this set-up or severe
injury or equipment damage could result.
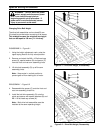
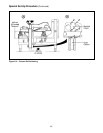
Outer Column Re-Positioning (Refer to Figure 6-4)
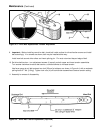
Moving the outer columns up one set of mounting holes increases the maximum box size handled by the case
sealer from 620 mm [24-1/2 inches] to 725 mm [28-1/2 inches].
To move the outer columns up one set of mounting holes:
1. Crank side drive belts to full open position.
2. Crank upper taping head frame assembly up approximately 330 mm [13 inches] from machine bed.
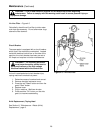
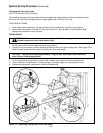
3. Place solid blocks approximately 305 mm [12 inches] high beneath upper taping head frame at rear of taping
head and under front flap folding ski (Figure 6-4A).
Note – Blocks (front and rear) must be the same height in order to keep upper frame level.
4. Crank upper taping head frame down until weight of upper frame is fully on blocks.
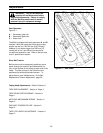
5. Remove and retain six mounting screws in each outer column assembly (Figure 6-4B).
6. Crank outer column up 100 mm [4 inches] and re-install six (6) screws in each column. Tighten screws.
7. Crank upper taping head up and remove blocks.
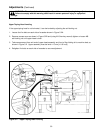
8. Check horizontal alignment of upper taping head frame and adjust as described in "Adjustments – Upper
Taping Head Leveling", page 30.
WARNING – A second person should assist with this part of set-up to hold (steady) upper
frame until columns are re-positioned and column screws are installed and tightened.