


SUPREMA 2001 - OPERATION & SERVICE MANUAL
Page 52 of 60 July 6, 2001 Suprema 2001 - Operation & Service
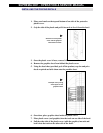
REMOVING THE REAR CIRCUIT BOARD
1. Switch the coffee maker "OFF".
2. Open the outer door.
3. Remove the waste container.
4. Remove the brewer.
5. Remove the brewer bracket.
a) Loosen, but do not remove, the two screws on the left side of the brewer
bracket.
b) Remove the center screw (on the left side in the middle) from the brewer
bracket.
c) Lift the brewer bracket until it clears the mounting "joggle" and carefully
pull it forward.
d) Unplug the brewer wiring harness from the rear board.
e) Set the bracket aside.
6. Slide the water tank forward, approximately 3 inches (8 cm).
7. Disconnect all the wiring harnesses from the rear board.
8. Remove the screw that secures the rear board to the back wall of the
coffee maker (located on the right side of the rear board cover).
9. Remove the rear board.
a) Grasp the board and lift it up to free it from the joggle.
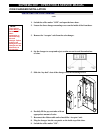
INSTALLING THE REAR BOARD
1. Place the rear board onto the joggle on the rear wall of the machine.
a) Place the board on the back wall and slide it downwards until it aligns
with the joggle.
b) Hold it in place and secure it to the cabinet with a screw.
2. Connect all the cables and harnesses.
a) All the connectors are polarized as a protection and to help simplify
connections. This means that the harnesses can only be connected in their
proper location, as they will not fit onto any other location.
3. Slide the water tank back into place.
4. Install the brewer bracket.
a) Connect brewer harness to the rear board.
b) Install the brewer bracket onto the joggles and lower into position.
5. Replace the brewer.
6. Replace the waste container.
7. Switch the coffee maker "ON".
8. Adjust all the settings (gram throws, water volumes, etc.).
!
Note:
The settings and
counters are
stored in the rear
circuit board. If
the board is
replaced, the
information will be
lost.