


4-3
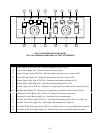
4.3 Analog Controller Operating Instructions
WARNING
Before pressing the power switch to the ON position, ensure that the frypot is
properly filled with vegetable oil. See Section 4.1.
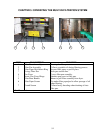
1. Verify that the thermostat knob is set to the desired cooking temperature. For split-vat units, set
both knobs.
2. Press the power switch to the ON position. The POWER light will illuminate. For split-vat units,
both power switches must be placed in the ON position if both vats are to be used.
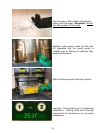
3. If the frypot temperature is below 180°F (82°C), the controller will automatically enter a warm-up
cycle (often called a melt cycle). The heating elements will cycle on and off repeatedly, allowing
the vegetable oil to heat gradually, without scorching. During the warm-up cycle, the heating
mode light will alternately illuminate and go off as the elements cycle on and off. Within about 45
minutes, the controller will exit the warm-up cycle and the heating mode light will remain
continuously illuminated.
4. When the vegetable oil temperature reaches the thermostat knob setpoint, the elements will cycle
OFF and the heating mode light will go off, indicating that the fryer is ready for the cooking
process to begin.
4.4 Analog Controller High-Limit Check
Tools needed:
Maple Paddle
Note: Conduct this test when fryer will not be needed for about one hour, and when the vegetable oil
is due to be changed. Discard the vegetable oil after completing this check
Note: Check high-limit on only one vat at a time.
CAUTION
Grease filters must be in place and exhaust fans MUST be ON during entire high-limit
control-check procedure.
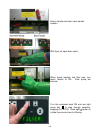
1. The vegetable oil should be at the normal/shortening level line. Add vegetable oil if necessary.
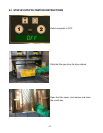
2. Remove the computer probe from the probe holder and replace it with fry vat probe.
3. Turn the vat power switch to “ON” and set thermostat knob to its highest setting, and wait for
heating light to go OFF.