


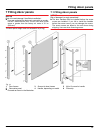
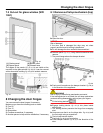

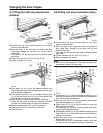
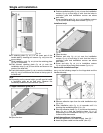
Fig. 31
u
Close the door.
u
Pull cover
Fig. 31 (10)
forward and then upwards to
remove.
u
Lift off cover
Fig. 31 (11)
.
CAUTION
Risk of injury if the door tips out!
u
Keep a steady grip on the door.
u
Set the door down carefully.
u
Unscrew upper bearing bracket
Fig. 31 (12)
(2 x Torx 25)
Fig. 31 (13)
and pull it upwards to remove.
u
Lift the door upwards to remove and set it to the side.
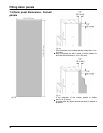
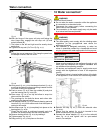
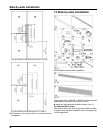
8.4 Swapping bearing parts
Fig. 32
u
Unscrew bearing bracket
Fig. 32 (20)
together with
bearing pin
Fig. 32 (27)
(3 x Torx 25)
Fig. 32 (21)
. When
doing so, hold panel
Fig. 32 (22)
steady so that it does
not drop.
u
Carefully lift off the cover on the handle side
Fig. 32 (23)
and the plug
Fig. 32 (24)
and move them to the opposite
side.
u
Unscrew screw
Fig. 32 (25)
and move it to the opposite
side. When doing so, hold panel steady so that it does
not drop.
u
Unscrew bearing part
Fig. 32 (28)
, turn it 180° and
tighten
Fig. 32 (29)
.
u
Remove bearing disc
Fig. 32 (26)
from bearing pin
Fig. 32 (27)
.
u
Unscrew bearing pin
Fig. 32 (27)
, move to other side
and place bearing disc
Fig. 32 (26)
on.
u
Using a cordless screwdriver if necessary, attach the
bearing bracket
Fig. 32 (20)
to the new hinge side . First
fit the lower center screw, then the other screws.
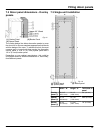
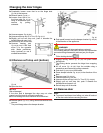
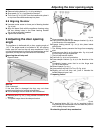
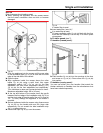
8.5 Swapping the clip-on frame
Fig. 33
u
Unscrew the part of the frame that is on the hinge side
Fig. 33 (30)
. Ensure that the top and bottom bushes
Fig. 33 (31)
do not fall out.
u
Unscrew the part of the frame that is on the handle side
Fig. 33 (32)
and screw it onto the opposite side. Do not
overtighten the screws!
When assembling the frame parts ensure that the corners
fit together as snugly as possible.
If a framed panel (see 7) is used:
u
Unscrew the part of the frame that is on the hinge side
Fig. 33 (30)
and screw it to the opposite side. Do not
overtighten the screws!
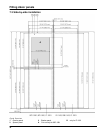
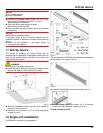
8.6 Fitting the door
u
Move bearing pin
Fig. 31 (14)
in upper bearing bracket
to other side
Fig. 31 (12)
.
u
Ensure that the bearing disc
Fig. 32 (26)
is on the
bearing pin below
Fig. 32 (27)
.
u
Position the door from above onto the bearing pins
below
Fig. 32 (27)
.
u
Close the door.
u
Insert the upper bearing bracket
Fig. 31 (12)
on the new
hinge side into the door.
u
Secure upper bearing bracket
Fig. 31 (12)
(2 x Torx 25)
Fig. 31 (13)
. Make preliminary holes (optional) or use a
cordless screwdriver.
u
Snap both cover
Fig. 31 (10)
and cover
Fig. 31 (11)
into
place on the opposite side.
Changing the door hinges
21