FORM 160.55-O1 (604)
137
YORK INTERNATIONAL
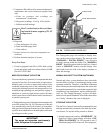
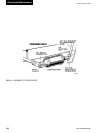
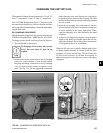
FIG. 62 – CHARGING OIL RESERVOIR WITH OIL
25721A
OIL CHARG ING VALVE
LD00472
at the charg ing valve until after the air is forced out
by pumping a few strokes of the oil pump. This Þ lls
the lines with oil and pre vents air from being pumped
into the sys tem.
3. Open the oil charging valve and pump oil into the
sys tem until oil level in the com pres sor oil res er voir
is about midway in the upper sight glass. Then,
close the charg ing valve and dis con nect the hand
oil pump.
4. As soon as oil charg ing is com plete, close the pow er
sup ply to the starter or Variable Speed Drive to en-
er gize the oil heater. This will keep the con cen tra tion
of re frig er ant in the oil to a minimum.
When the oil res er voir is initially charged with oil, the
oil pump should man u al ly be start ed to Þ ll the lines,
pas sag es, oil cooler and oil Þ lter. This will low er the
oil level in the res er voir. It will then be nec es sary to
add oil to bring the level back to the center of the upper
sight glass.
The nominal oil charge for the com pres sor is: 10 gal. “B”
and “C” com pres sor; 15 gal. “E” and “F’ com pres sor.
New oil YORK Refrigeration Type “C” must be used in
the centrifugal compressor. Since oil absorbs mois ture
when ex posed to the atmosphere it should be kept tight ly
capped until used.
OIL CHARG ING PRO CE DURE
The oil should be charged into the oil res er voir using the
YORK Oil Charging Pump - YORK Part No. 070-10654.
To charge oil into the oil res er voir pro ceed as follows:
1. The unit should be shut down.
If charg ing oil to restore the cor rect
lev el, the unit may be kept in op-
er a tion.
2. Immerse the suc tion con nec tion of the oil charg ing
pump in a clean con tain er of new oil and con nect
the pump dis charge con nec tion to the oil charg ing
valve (A) lo cat ed on the remote oil reservoir cover
plate. (See Fig. 62). Do not tight en the connection
CHARGING THE UNIT WITH OIL
6


